Unless the reason for not being able to flash is loss of the micro-USB port, then you should file a new topic. It wasn’t clear if the reason you cannot flash is due to missing the port or not. Regardless, either way there are options, but it would be best to first know if the micro-USB port (used for flashing) is available or not.
I have a micro-USB port( please note that I did the first boot. And mistakingly delete some files and the system does not work properly. I just see the cross as a mouse and web browser and that is it). Could you provide me the steps?
I went through this steps. However, my jetson is TX2, and also I could only find this file in Nvidia which is .run (3.2.1). But it could not solve my problem.
Most steps which would repair this are a bit involved, and may not fix anything since there is no exact list of files. FYI, the TX1 may have different instructions than does a TX2, but mostly they will be the same. The part which differs most is that the TX2 will have releases available to it which may not be supported for the TX1. Whenever you find documents for Jetsons try to be aware of whether or not (A) the Jetson model is the same, and (B) whether or not the L4T release is the same.
A listing of JetPack/SDKM releases is here:
https://developer.nvidia.com/embedded/jetpack-archive
A listing of L4T releases (which is what JetPack/SDKM is a front end to during flash) is here:
https://developer.nvidia.com/linux-tegra
The L4T release (if the release version matches what is installed on the Jetson) has a download listed as the “sample root filesystem” (the sample rootfs). Basically JetPack/SDKM downloads and unpacks the “driver package” (which is what creates the “Linux_for_Tegra/” subdirectory; sudo is not used to unpack this). Then, within the empty “Linux_for_Tegra/rootfs/” subdirectory, JetPack/SDKM unpacks (with sudo) the “sample root filesystem”. Most of the files you are missing are from the sample rootfs.
Some files in “/boot” and other parts of the system are actually added into the “rootfs/” from the “Linux_for_Tegra/” directory command “sudo ./apply_binaries.sh”, and then some “rootfs/boot/” configuration is added upon actual flash. If you have this content from your previous flash, then you will have all of the missing files:
~/nvidia/nvidia_sdk/JetPack...version.../Linux_for_Tegra/
Those files will be within the “Linux_for_Tegra/rootfs/” directory, which will be a nearly exact match to everything on your Jetson. Provided that no updates were done…updates may cause a database of packages which is out of sync with the actual files from the original flash. So you can go down that path of trying to add files back in, but I’ll suggest you are better off just flashing from scratch using JetPack/SDKM.
If you have valuable content on the Jetson, then you can clone what is there before flashing. The clone can be loopback mounted and accessed from the host PC (or even from the Jetson if the clone is on the SD card or an external USB hard drive). Do you have valuable content you need to save? If not, just flash with JetPack/SDKM. If you do, then you have clone options.
I do not have any important content and I only need to flash the Jetson(or literally Boot from scratch to be sure all the necessary files are ready in their place). However, I do not know the best way. So I followed
these steps and this
. Please if you have a better way to flash or update which may fix share it? (I do not know a better way than what is discussed here for flashing or updating)
About the links, you were sharing with me. I did not find the “,run” files that I can use them:(
You’re using a TX2 with software that is four years newer than what that first article posts, so I suggest using official docs (I will list URLs later). The other article is about three years old. A lot has changed since then.
The “.run” files only apply to installing extra versions of CUDA on the host PC. If you stick to JetPack/SDKM for installing to the PC, then this will put a version in which is compatible with both the PC and the Jetson. You would not find those “.run” files in the same place where you get the Jetson-compatible ones, and you can ignore this unless you need more than one release of CUDA on the same host PC and don’t want old releases removed while adding new releases. So just ignore any “.run” file formats unless you must have multiple CUDA releases on the same host PC (e.g., some people might work with multiple Jetson installs which have very old content on up to and including the bleeding edge release).
The method which works best and is simplest is to try to use the most recent JetPack/SDKM. The releases available are here:
https://developer.nvidia.com/embedded/jetpack-archive
Right now JetPack 4.5.1 is listed as most recent. If you go there, then notice that the download for SDKM is different for Jetson Nanos, Jetson NX, and “all other” Jetsons (including the TX2). So you’d use the “FOR ANY JETSON DEVELOPER KIT” download.
That same URL has several documents of use. In particular, see:
https://developer.nvidia.com/jetson-tx2-developer-kit-user-guide
https://docs.nvidia.com/jetson/l4t/index.html
In the first document for the TX2 developer guide, notice in the index that “JetPack” starts at page 7. On page 9 it gets to the SDKM instructions. This is the official document starting point for flashing from an Ubuntu 18.04 host PC.
Just to emphasize, anything you see listed as “JetPack” or "SDKM is essentially the same thing, and these are front ends which perform a number of steps you could do manually, but JetPack/SDKM consolidate a lot of steps and let this front end perform many of the more tedious steps. The URL I mentioned above for the TX2 actually points out this document for details of using SDKM:
https://docs.nvidia.com/sdk-manager/index.html
NOTE: “Drive” is mentioned in SDKM. Ignore this, it is for the autonomous vehicle developers and is not part of Jetsons. SDKM has the ability to log in to either the Jetson developer program or to the program for autonomous vehicle development. Be sure to pick the correct login since it is not always obvious you need to pick the other…many details of SDKM can be enabled or disabled, but the GUI does not always make this obvious. If in doubt and you have an error, examine to see if there was some option you could change, but which was not obvious that a choice was available.
Assuming your Jetson is in recovery mode with the micro-B USB cable, then you should be able to just run “sdkmanager” as a regular user on the host PC and it will lead you through the steps. Note that SD card boot is not the default, and that you should probably flash normally at first (this is useful for various non-obvious reasons even if you want to boot from SD card). Once the regular boot works there will be other information on SD card boot. Be sure your document is for the TX2 and not another model, and be sure sure the document is for that release since boot code changes a lot over releases.
Note that if you do have regular boot restored, then there are a number of ways to get the SD card to become the root filesystem. For example, a recursive copy of the eMMC rootfs, followed by edits to the “/boot/extlinux/extlinux.conf” file.
“In the first document for the TX2 developer guide, notice in the index that “JetPack” starts at page 7. On page 9 it gets to the SDKM instructions. This is the official document starting point for flashing from an Ubuntu 18.04 host PC.”
My virtual machine is 16.04 and it was saying that it is okay, isn’t it?
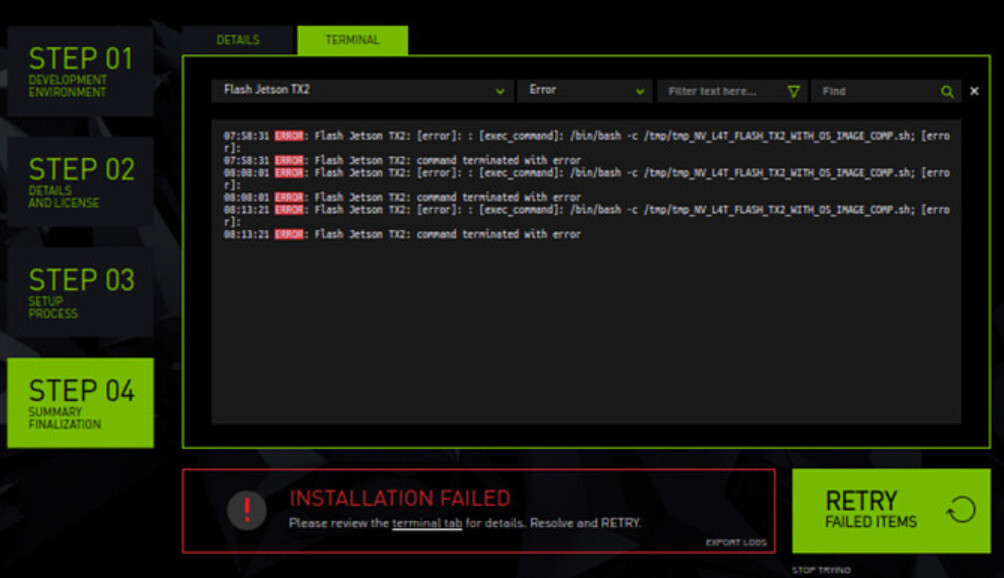
I followed the mentioned steps, I got the following errors and failure. I would like to go from scratch visually by steps.
1.
the problem:

There is nothing(even terminal is not available with shortcut keys). But I found Ctrl + Alt + F5 which leads to terminal!
The internet is available in browser, but I could not ssh to the tx2 anymore(permission denied).
I think some essential files are deleting or missing. Anyway.
2,
2.1 Solution. I went through different methods. But non of them did not fix my issue(As they failed).
But I would like to share the recent way I took as you mentioned in your last links and guides regard to Jetson TX2.
2.2 Last approach,
2.2.1 I run a virtual machine Ubuntu 16.04 on my host with VirtualBox(RAM>9, Storage = 60G).
2.2.2 Then follow simply the steps this. My linux installed automatically and I type “sdkmanager” in linux terminal and I got the following(as you can see the Jetson TX2 is detected and lsusb command in terminal detected it as well ( as It is already in force recovery mode).
- Surprisingly, the steps for force recovery which is described in this does not work in my Jetson TX2. I followed this and it works(It is for TX1!!!, mine is TX2). (From working I mean, lsusb command in terminal shows Jetson! and also sdkmanager detect my device as Jetson TX2).
Anyway,
2.2.3 I am double ask this question here to make the flow stable and easy to track. The following is the error I got and failed to flash the OS.
FYI,

1
I checked the lsusb during the work to be sure that it is already connected and it is fine.
2.
The virtual machine has its own internet(The ip address is given by PC and it is 10.0.2.15. The PC ia connected to the same router as Jetson is connected.
The Jetson Tx2 is also has internet and its IP is given with ethernet cable and wifi and their IP addresses are 192.168.0.16 and 192.168.0.18.
Technically Ubuntu 16.04 should work, but people who use this a rare. 18.04 is a known good working release. You can try with 16.04, and I would actually expect it to work, but my confidence is not nearly as high as with 18.04.
Using a VM is not supported, and is the cause of a very high number of flash failure issues. This does not mean you cannot get a VM to work, but you are far better off with something dual boot to a native Ubuntu 18.04. The main problem of getting a VM to work is that the recovery mode Jetson repeatedly disconnects and reconnects USB during the flash, but quite often the parent o/s of the host PC will intercept a reconnect and the VM will not have access to the USB after that. Every VM is different in how it deals with this, but there is nothing NVIDIA would be able to do about a host o/s blocking USB access after a reconnect. I want to emphasize that VMs have a “very high” failure rate during flash.
You could ask the VM help support about this, but if there is any way you can dual boot or otherwise use a native Ubuntu install, then it would be far easier in the long run.
Then, could you please provide me a link that you are sure about that OS? I will try to go with it.
One more thing. I just try disconnecting the USB B while Jetson is in force recovery mode. Then try lsusb in terminal, “nvidia corp” disappears. then connect USB B again, “nvidia corp” appears in terminal. and I try it for several times. So the VirtualBox working fine to handle repeatedly disconnects and reconnects!
FYI, if you want to install dual boot natively with Ubuntu 18.04, then this is the URL to go to (the “desktop” version):
https://releases.ubuntu.com/18.04/
Yes, unplugging and replugging is a workaround for this. However, if the VM were configured correctly, then you would not have to do this. The entire flash would succeed from start to finish without the unplug/replug. I don’t know what settings are for any of the many VMs, but once set any flash will be much less troublesome. Still, a native install is simplest of all.
1 Like
I did try two of 16.04 and 18.04 Ubuntu(JetPack version it is flashed with is 4.5.1). I could be able to flash OS to Jetson with sdkmanager. But theCuda part, did not install.
The main error in both cases is:
Error in local apt
The error log:
192.168.55.1

I did test
pinging device192.168.55.1
lsusb: Bus 001 Device 006: ID 8087:0aaa Intel Corp.
I did try:
sudo apt-get update
sudo apt-get upgrade --fix-missing
sudo apt update
I try with both (individually or separately) host WiFi connection or host wired Ethernet connection
Is there any other way i can test? or have Cuda on jetson TX2.
Just in case, I did plug/unplug USB to check that weather the VM recognize the connection or not.
It would be better to have a single thread on the issue rather than several…it can be time consuming tracking different threads for the same issue. However, some checklist items are useful here:
- You must be able to ping the Jetson’s address from the host PC. Usually
192.168.55.1. - If the Jetson was recently flashed, then it must have completed first boot setup (otherwise there is no login account to add packages from).
- The host PC must be able to log in via
sshto the Jetson using the admin account (I’ll pretend you created account “ubuntu” and the IP address of the Jetson is192.168.55.1). You can test via this, from the PC, and this must succeed if package addition to the Jetson:
ssh ubuntu@192.168.55.1 - The host PC must have internet access. If there is a proxy or firewall, then you may need to adjust.
- Flash is always with the Jetson in recovery mode, but package management is always with a fully booted Jetson. Flash can only occur in recovery mode, and when flash completes, the Jetson will automatically reboot. There will be no login account upon that first reboot unless you’ve completed the account creation. Sometimes people have trouble with this, and then reboot the Jetson, followed by finding that the first boot setup can now succeed.
- Actual text based logs are superior to screenshots. Often the error itself is less relevant than the setup steps which occurred prior to the error. SDKM does have an export logs function.
- Sometimes the host PC or Jetson won’t update until the following is done (due to package changes the package manager wants confirmed as ok to fix):
sudo apt update
sudo apt --fix-broken install
I went through all steps. and
sudo apt update
sudo apt --fix-broken install
on the host Ubuntu was done.
The errors were all network errors. I did find something interesting here, I’ll try to describe.
Your network is trying to download a file from a standard Ubuntu server, not the NVIDIA server. All Ubuntu installs via network would do exactly this, and it isn’t specific to the Jetson. Look at this URL:
http://ports.ubuntu.com/ubuntu-ports/pool/main/libx/libxmu/
Note that this is the non-encrypted “http” address, and not “https”. You should be able to reach this with a web browser. This was an address your errors failed on, except the failure was with https. Apparently the https server (owned by Ubuntu, not NVIDIA) is missing the ability to work encrypted. All https to that server seems failed.
Not sure, but maybe NVIDIA could check with someone to see if there is a valid way to use non-https, at least temporarily.