how to check downloaded tegra files and access this without command line?
i have downloaded both files but in different location can i copy these files to tegra-image-maker instance and avoid to download same files because it takes so much time and give error of time out ?
when i run this command some times its running okay but sometimes we got error
C:\Windows\system32>multipass exec tegra-image-maker bash
exec failed: ssh connection failed: ‘Socket error: disconnected’
please suggest answer
It sounds like the VM might not be running or you somehow can’t connect but I haven’t encountered that error so I can’t say for sure. When that happens, what does multipass list show? It should show something like this:
Name                    State             IPv4             Image
tegra-image-maker       Running           172.17.204.123   Ubuntu 18.04 LTS
If you need to start over, you can multipass delete --purge tegra-image-maker. multipass --help will give you a full list of commands you can run related to creating, starting, deleteing, and managing Ubuntu instances.
which multipass type better for doing this hyper-V OR virtual box ?, i have windows 10 pro system
Hyper-V will give best performance on Windows Pro. If Windows home, Virtual Box can work.
i have downloaded both files but in different location can i copy these files to tegra-image-maker instance and avoid to download same files because it takes so much time and give error of time out ?
You can use multipass mount for this. It works a lot like the --volume docker run flag:
multipass mount --help
Usage: Program Files\Multipass\bin\multipass.exe mount [options] <source> <target> [<target> ...]
Mount a local directory inside the instance. If the instance is
not currently running, the directory will be mounted
automatically on next boot.

Options:
  -?, -h, --help                   Display this help
  -v, --verbose                    Increase logging verbosity, repeat up to
                                   three times for more detail
  -g, --gid-map <host>:<instance>  A mapping of group IDs for use in the mount.
                                   File and folder ownership will be mapped from
                                   <host> to <instance> inside the instance. Can
                                   be used multiple times.
  -u, --uid-map <host>:<instance>  A mapping of user IDs for use in the mount.
                                   File and folder ownership will be mapped from
                                   <host> to <instance> inside the instance. Can
                                   be used multiple times.

Arguments:
  source                           Path of the local directory to mount
  target                           Target mount points, in <name>[:<path>]
                                   format, where <name> is an instance name, and
                                   optional <path> is the mount point. If
                                   omitted, the mount point will be the same as
                                   the source's absolute path
I am writing this from a computer that does not currently support WSL2, but if your PC does support it, you can probably use that instead of multipass and it could be easier to transfer files as well.
Hi mdegans,
Your this post has masked as solved on this topic.
As I am new to Jetson Nan, I still don’t know how to clone a SD card image. The SD card is on Jetson nano, which has installed lots of my apps and the components installed from SDK Manager.
The tool jetson-disk-image-creator.sh is running at host machine (Ubunbu 18.04), how it create a SD image from a SD card on Jetson nano?
Based on
And there you have it. **You can copy sdcard.img** to your host (or wherever) **and flash it on a SD card with Etcher** , and it will include your software pre-installed.
It seems that the tool is to create a SD card image from the host, so that it can be flashed into a SD card to boot up at Jetson nano, is it?
If yes, which software can be pre-installed here? Are the SDK target components preinstalled in the created image? How can I pre-install the camera driver from e-con system here?
If not, how can I clone Jetson Nano SD card (with lots of apps installed during development process) for development purpose only?
Note: my application development is on Jetson Nano. It may result my development environment damaged after installed something during development process. If I can clone a SD card image at some point for recovery purpose only, which is very helpful as no need to re-install everything again if the development environment damaged.
I have tried following methods. None of them is working for me.
- Using Win32DiskImager.exe to read whole SD card as an image file. Wrote the saved image to a SD card can’t boot up Jetson Nano.
- Using dd command from Jetson Nano to back mmcblk0p1 at used size. Using dd command to restore the backup file to mmcblk0p1. Jetson nano can’t boot up after restored.
Yes. That’s what this procedure does. You install your app within a chroot of a new rootfs, make a .img out of that, and then flash it to a SD card.
According to their documentation, they provide their own SD card image. I can’t speak to it’s quality, but you might be able to copy it’s files into the rootfs directory. If I were you, I might consider another camera manufacturer if they cannot package their driver properly.
They should provide the source, or at least a binary blob with a dkms support like Nvidia does for their driver on linux and Google does for Coral. A full, system image, out of date and likely with predefined credentials (ssh keys, users, passwords, and other mystery modifications), is not a secure option.
Otherwise not only might you have security issues, but this will be incompatible with Nvidia’s OTA updates. The driver will break on every kernel update forcing you to use e-con’s manual update procedures.
Yes. The components downloaded from tarball are the same as those installed by SDK Manager. SDK Manager is not necessary for this procedure. You can this procedure from a headless VM, even one in the cloud.
The easiest way is to use gnome-disks on a linux computer with a sd card reader to back up and restore the SD card. It’s not possible from the Nano itself. dd can also work but runs the risk of very easily overwriting something important. That is suitable for backing up and restoring to the same exact device. The target SD card must be the same size or larger without doing some fancy partition resizing.
Hope this helps!
in order to be able to restore sdcard dd image it needs to be taken from the entire disk, not just from the single partition:
mmcblk0p1
mmcblk0
otherwise mmcblk0p1 could only be restored as a single partition through mksparse/flash.sh method to the sdcard that has already been flashed with exactly same Jetpack version related to the source jetson board used for the image creation
Regarding the e-con
They have a simple-deployment image with drivers integrated, but it is of obsolete Jetpack version.
So the only way to get drivers with the latest Jetpack is to “patch”/upgrade existing OS with adding drivers.
Once the driver support is implemented it could be cloned so that the image will have the driver added.
Finally,
It is possible to restore sdcard image from nano itself, but it requires to use sysrq triggers/ magic keys to halt disks, so it is more handy to do it from sdcard reader
Hi Andrey1984,
Thank you very much for your help.
I ma using Jetpack 4.3 as the camera driver is only supporting this version.
Based on the Disk partition
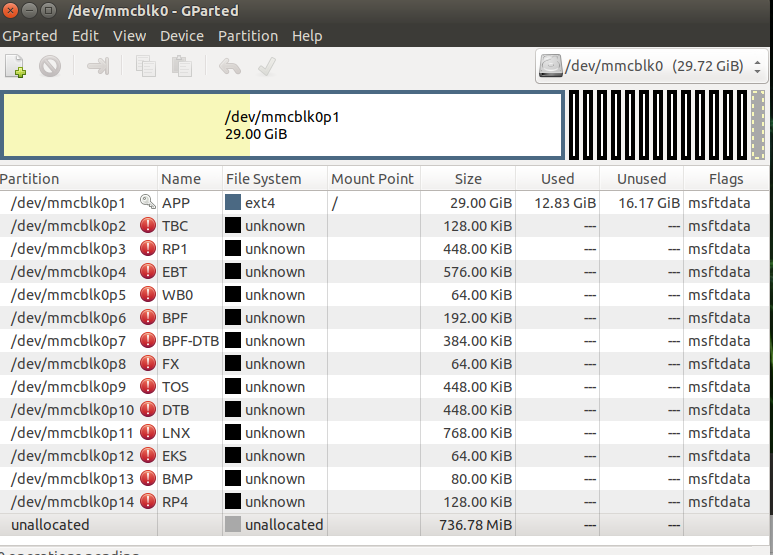
I can’t use dd command to backup whole disk mmcblk0 as no space to store the backup image. I don’t know if backup the used size the other blocks have been stored or not. From the picture, I can see the mmcblk0p1 has enough space to store the backup image. but failed on reboot.
The e-con system simple-deployment image with drivers integrated is useless for me as it is NOT including the Nvidia target components I needed.
I was advised to install all the nvidia target components on Jetson Nano first, and then run its installation script to install the driver, and update the file system on the SD card. That is why backup the SD card is important for me during the development periods.
`It is possible to restore sdcard image from nano itself, but it requires to use sysrq triggers/ magic keys to halt disks, so it is more handy to do it from sdcard reader`
Can you give me more details on this point?
Thanks
to which targed did you try to write backup image? to the same sdcard? else?
Thank you for your info.
I am going to try your suggestion of
The easiest way is to [use gnome-disks on a linux computer](https://www.maketecheasier.com/backup-hard-drive-gnome-disk-utility/#:~:text=Inside%20Gnome%20Disk%20Utility%2C%20click,will%20start%20the%20restoration%20process.) with a sd card reader to back up and restore the SD card
I tried to dd to the same SD card from Jetson Nano.
Is it able to write to other SD card from Jetson Nano?
it doesn’t work like that
it needs to be dumped to any other disk storage than the sdcard that is being dumped
Actually you would be better off dumping sdcard on some other device than jetson itself
I use dd command backup ASUS Tinker Board image to the same SD card and restore it by using Win32DiskImager. It works fine as its rootfs is located in the last block. That’s why I tried it on Jetson Nano and not work.
I tried on Windows 10 by using Win32DiskImager to read whole SD card as an image and write the image to another SD card. It does not work.
it assumes use of linux OS;
you may try with live ubuntu
Please tell about Cuda installation, when we flash downloaded jetpack image in this Cuda already installed but when we are doing customizing image in that we try to install tensorflow-gpu we facing Cuda/gpu error. please suggest about Cuda installation…
I want to install deepstream5.0,cuda 10 and other some packages ,please suggest and How to install NVIDIA apt key and create a NVIDIA sources.list ?
@mdegans
Thank you so much for this guide to manipulating the rootfs and creating an image. I successfully updated the filesystem with packages and repos I want in an image and the Nano boots and runs through setup properly.
Is apply_binaries.sh supposed to install things like cuda and nvidia tensorrt? I am getting an error about importing libnvinfer.so.6 and I don’t see cuda in /usr/local/. I’m a rookie though, so maybe I am just missing something. I tried using nvcc to check the cuda version but it doesn’t seem to exist.
I thought this would have the same things installed as when I use nvidias Nano image, but maybe I need to install other things from https://developer.nvidia.com/embedded/linux-tegra-r32.4.2 like the CUDA tools?
@loophole64
YW. Glad the guide helps.
Apply_binaries.sh should apply the kernel, modules, and various packages. I believe cuda may be on the rootfs already, but running apply_binaries.sh won’t hurt. nvcc is not in path by default, which is why it won’t be found. You must add /usr/local/cuda/bin to path (eg. PATH=$PATH:/usr/local/cuda/bin). After that nvcc should be found. Try that and see if nvcc is found. The CUDA tools are generally supposed to be installed on a linux host. Nsight, for example, can connect to a Nano via ssh.
I don’t beleive libnvinfer.so.6 is included in JetPack 4.4. libnvinfer.so.7 is the soversion included with JetPack 4.4 (actually 7.1.3). It’s normal for it not to be found. libnvinfer can be found in /usr/lib/aarch64-linux-gnu/. What software are you installing that complains about this? It might need to be updated if it is looking for an old version of nvinfer.
To enable Nvidia apt sources, edit /etc/apt/sources.list.d/nvidia-l4t-apt-source.list so it looks like this (replace <SOC> with t210 on Nano). On NX, it would be t194 instead, but the same procedure applies.
deb https://repo.download.nvidia.com/jetson/common r32.4 main
deb https://repo.download.nvidia.com/jetson/t210 r32.4 main
The key should already be installed. It’s only necessary to install it if you are using an alternative Ubuntu aarch64 rootfs like Ubuntu Base or one created with a bootstrap tool.
Once you do that, you can just apt update && apt install deepstream-5.0 to install deepstream (or whatever).
@mdegans
I see my mistake now. I was intentionally using an older version thinking it was the one included in Jetpack 4.3, but there are 2 versions of L4T identified as being part of Jetpack 4.4. I need to go back one more version. Thanks again.
Edit: Interestingly, there is no CUDA directory under /usr/local/ even though I ran the apply_binaries script. I’ll be curious to see if it exists when I create the new image.
“apply_binaries.sh” does not add optional packages. The image flashed will always be a “basic” image. What this script does is to add NVIDIA drivers to an otherwise purely Ubuntu image.
The CUDA content in “/usr/local/” requires install after first boot setup is complete, and uses networking to log in to the account you just created, followed by scp to the Jetson and running the dpkg install commands.
Note: If you get a build set up the way you want, then you could clone it, and then installing from the clone would already have all of that in place.
@linuxdev
Thanks for the info. As for cloning, you have come full circle. Check the title of the thread, lol. Directly cloning a Nano that has been setup already is the idea of this discussion. How? Through much discussion, it seemed like it is a bad idea, and instead we should manipulate the rootfs dir before setup to include packages we want.
Is there any comprehensive list of things that are included in the SD Card image from the Jetson Download Center that will not exist in rootfs after the apply binaries script has been run?