Board : Jetson Xavier NX dev kit sub
Boot disk : ssd/yet to attach
Case : No/ Using jumper cable to use control pin
I am currently undertaking the task of setting up Jetson for the first time, and I’m utilizing Ubuntu 18.04 on a Windows-hosted VirtualBox for this purpose. Despite diligently following the guidelines provided on website that I bought the board, I’ve unfortunately hit a roadblock.
I’ve successfully bridged the REC and GND pins, which has enabled the virtual machine to detect Jetson.( If I disconnect REC and GND, SDK manager can’t detect the board)
I opted for Jetpack 4.6, and patiently awaited the completion of the download and installation process.
According to the manual, at this stage, the Jetson should automatically reboot, displaying a configuration settings window on the connected monitor. However, this hasn’t occurred.
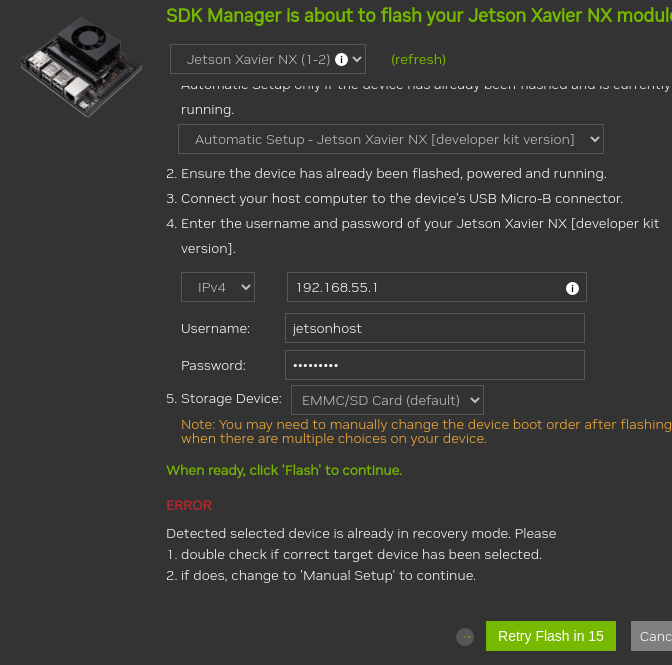
The attached photos the message that appeared when the OS image was ready.
As I haven’t had the opportunity to set up a username and password for Jetson, I am unsure how to proceed with this step. When I attempt to proceed by clicking ‘flash’, an error message is generated.
I would greatly appreciate your prompt assistance in resolving this matter. Thank you in advance for your time and support.
Automatic Setup is for users who already have their board flashed with L4T, and want to install JetPack component, and the device has to be currently running.
In your case, you should choose Manual Setup to proceed.
Exactly It is not my own screen shot. but It may looks like my situation.
So as the manual, I have to connect adaptor but powered off however there is no button for power or REC just control pins.
I think the instruction is clear enough.
It’s not :
It says me to remove jumper cable for entering REC mode.
You should first place the jumper, power on your device to enter REC mode, and only at this time can you remove the jumper, but you can also keep it, just remember to remove it when the flashing process is done and you want to boo your device.
Okay, I will follow your advice.
But one more thing, The manual of mine says inserting nvme ssd after then flashing. as more clearly, It says flash like sequences above without any nVME ssd or sd card. Even the board doesn’t have sd card slot only ssd.
Is it right?, Follow the manual setup without the ssd.
What manual are you referring to?
If you want to use your SSD as rootfs, then just choose it under the Storage Device option in SDK Manager. What’s the point to flash into eMMC and then move it to the external SSD?
Oh, I understood about it. I flash into eMMC and move it to the external nVME SSD.
So. I first flash without SSD and follow the suqeunce above and then I insert it with some way to move it.
After the board boot as recovery mode then I remove the jumper cable.
After the board boot as recovery mode then I remove the jumper cable.
Click ‘Flash’…
I think you are right, but again, why do you want to flash it into the eMMC first, and then move the system to the SSD?
You should be able to flash it directly into the SSD.
It’s not whether it’s good or not. I just think it’s redundant.
You should find NVMe available under the Storage Device option.
May I know what manual are you referring to?
I’m here again.
Actually I followed your advice like flash as manual setup.
I booted my board as forced recovery mode with jumper cable on REC pin.
A few seconds later, SDK manager detected the board then I removed the jumper cable and clicked ‘Flash’
The progress bar moved about 2~3% and popped up the error like the attached photo and my labtop made a sound ‘DDI-RONG’. It sounds like notifying connecting with my phisical machine.
At that time SDKmanager said error.
When I used terminal and followed the jetsonhacks manual ‘bootFromExternalStorage’, It said me to remove jumper cable and enter ‘y’.
So I removed the jumper but It said ‘lost connection’
Now I’m using Ubuntu 18.06 on Virtual Box in Windows, USB3.0, bridged network as preferences.
I found that virtual box has some error like above and I was recommended to use VMWare.
Is it can be solution?
it’s expected that there could be connection issues when using a VM. Like the device will be connected and disconnected multiple times during flashing, but it may be too fast to be caught by the VM.
So please do use a real Ubuntu PC, and we do not officially support issues regarding flashing with VM.