Cannot clone Jetson AGX Xavier: Failed to start Load Kernel Modules

Hi there,

I have been trying to clone one Jetson Xavier to another for weeks now, with no luck!

I am using the tools at the bottom of this page: https://github.com/r7vme/xavier-base-docker-images without SDKManager.

On the source Jetson I run: sudo ./flash.sh -r -k APP -G backup.img jetson-xavier mmcblk0p1
and on the destination one: sudo ./flash.sh -r -k APP jetson-xavier mmcblk0p1
having meanwhile beiing using the backup.img, sparse image, as system.img inside the target’s bootloader directory.

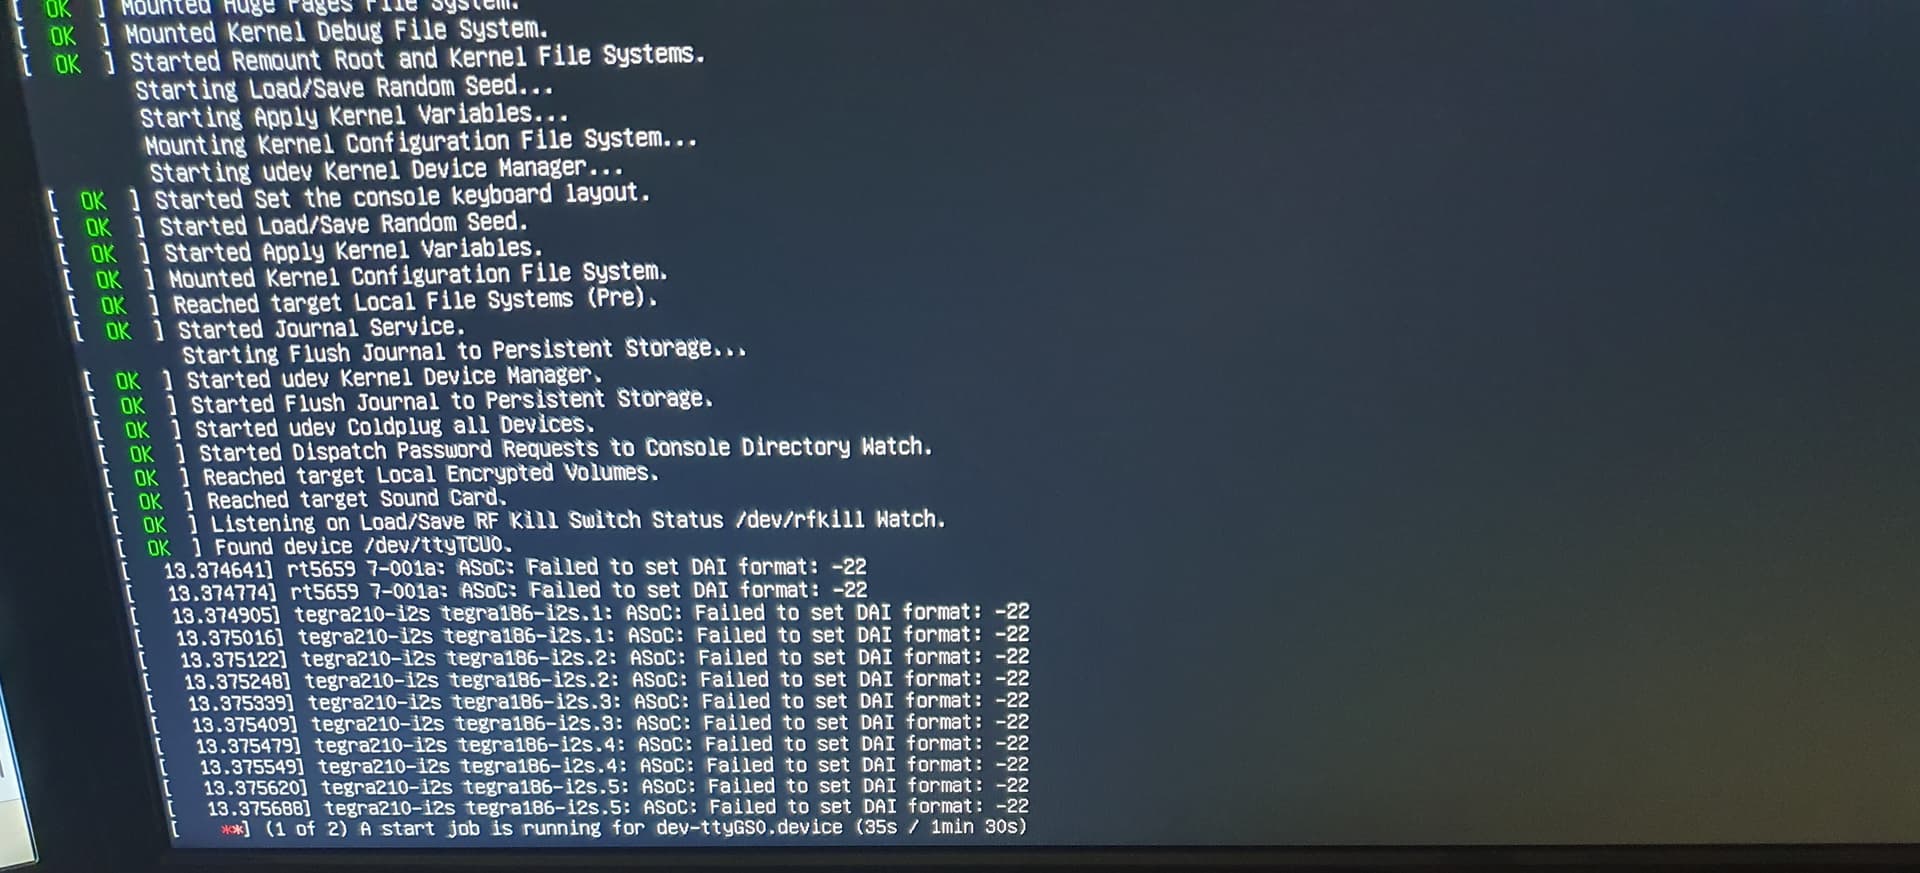
When the destination reboots, after the flashing, I get: Failed to start Load Kernel Modules
and then it is trying to mount some device or disk: dev-ttyGS0.device which keeps failing.

Note that the two Jetsons’ hardware is compeletely the same. They are identical and bought together.

I would appreciate your help!
destination.flash.backup.image.log (1.6 MB)
source.read.backup.image.log (2.8 MB)


You can try to dump the full dmesg log from uart console instead of showing some screenshot from your monitor. These screenshot didn’t provide much help.

What about the " 2>&1 | tee" logs (attached to the original mesage) of reading and flashing? Aren’t those any useful???

Pardon my ignorance but how do I dump the UAR console log? And on which device? The src or the dest?
The destination boots into emergency mode. How do I obtain such “logs” through the USB?

Are you able to see the website I just posted in previous comment?

Yes. Apolgies!

Is the attached what you are after?
uart.log (270.9 KB)

Also forgot to mention that I took and applied the images using the attached flash.sh patch.
On the source, flash.sh was complaining about not being able to find python and the dest was givining me an Error 3 right at the beginning of APP partition flash process.
flash.sh.diff (82 Bytes)

Hi,

Yes, that is the log I need. Some questions here

  1. Are you able to operate your device through that UART console? You can use some devices which have no such issue to validate whether your uart setup is correct first.

  2. Are the source and destination using the same kernel version and the kernel dtb version is matching or not?

  3. The jetpack version seems a little bit old. Which jetpack release are you using?

Hi,
Thanks!

  1. I cannot type into the terminal I run minicom. I also tried connecting the keyboard to the Jetson and rebooted too but no luck. Anything I press makes no difference and I do not get echo on my key presses.
  2. How do I check that?
  3. Ditto

Apologies for 2 and 3 but I am new to all this.
Many thanks!

  1. What I wanted to say is just forget about this issue and only use a normal jetson flashed by sdkmanger which you are sure it can boot up fine. Use this device to test if your UART console really can input something.

For 2&3, I am not sure why you don’t know the version here. Then what did you flash to your jetson in the beginning? I mean your source and destination jetson shall have their own jetpack version which flashed by you before.

Unfrotunately, someone else had flashed the source Jetson a couple of years ago and I don’t know what and how he did it!

I am not sure if this should go further.
It is more like you don’t know what is flashed on previous board and you don’t know what is flashed on current board (destination) either.

I feel you are mixing two boards with different versions together.

So you cannot provide any help to determine the versions?
Thanks in advnace! You’ve been extremely helpful and we’ve wasted out money on this junk.

Hi,

Sorry for that and please be calm.

May I ask what is your exact purpose now? Do you have to copy the data from that source or you just want to validate the clone process?

Are you able to operate that source device or restore the system image of that destination board?

Validate the clone proces?? Why would I do that?

We have bought 4 of those Jetosns. I want to clone 1 into another, i.e. make them the same; identical.
From source Jetson to destination Jetson.

If it is a realy hassle to you to help me out with this, please let me know.
We will escalate this to NVidia support; if such thing exists!

Don’t get me wrong but I’ve spent 3 weeks trying to do this: I even dd’ed via ssh from the source to a local PC and the result was the same! The dd image taken from the source had exactly the same dehaviour on the destination; the one you saw in the log.

I rest my case.

Sorry for saying that but there is indeed some other users who would try that…

Validate the clone proces?? Why would I do that?

My point is if you can check the source board and destination board, dump the uname -r and cat /etc/nv_tegra_release on them and share the result.

But the destination board needs to be the original state. That was why I asked if you can restore it.

Hello,

Screenshot suggests the destination system here is trying to mount a partition by UUID and not finding it.
Can you show contents of /etc/fstab and output of blkid on the source machine?

PS.
It’s possible for a source system to have configurations that are not compatible with a destination system even with matching hardware.

Problems occur when configurations use identifiers that are not transferred when cloning. Another example is a network interface MAC-address, which is not ideal to use in configurations when cloning devices as it is unique to that interface.

Hi @moisaksson and thanks for getting back to me!

cat /etc/fstab:

/dev/root / ext4 defaults 0 1

UUID=b94950a6-961e-4c2f-82ef-26c895ce7905 /xavier_ssd ext4 defaults 0 2

Indeed it does!

blkid:
/dev/loop0: SEC_TYPE=“msdos” LABEL=“L4T-README” UUID=“1234-ABCD” TYPE=“vfat”
/dev/mmcblk0: PTUUID=“06f3d197-faf5-4f0c-ab9f-ef1f6d68464c” PTTYPE=“gpt”
/dev/mmcblk0p1: UUID=“a16f3cee-082b-4a9b-b90d-6caa3e3e58c8” TYPE=“ext4” PARTLABEL=“APP” PARTUUID=“4885553d-fb4c-498e-ab19-3c07de3f4a43”
/dev/mmcblk0p2: PARTLABEL=“mts-mce” PARTUUID=“525546e5-5ac4-412c-95f2-d01e7d7ee43c”
/dev/mmcblk0p3: PARTLABEL=“mts-mce_b” PARTUUID=“370cfb09-53c6-4729-ada3-0a047124e67c”
/dev/mmcblk0p4: PARTLABEL=“mts-proper” PARTUUID=“2e0c1de0-8618-4a72-879f-822276e2dd6b”
/dev/mmcblk0p5: PARTLABEL=“mts-proper_b” PARTUUID=“77caae66-a06a-48e2-844e-6a710cce9c44”
/dev/mmcblk0p6: PARTLABEL=“cpu-bootloader” PARTUUID=“40ad8470-2595-40ed-a3f4-552a2bfd6341”
/dev/mmcblk0p7: PARTLABEL=“cpu-bootloader_b” PARTUUID=“01835c65-2443-4eab-9cf4-ec13c1aad862”
/dev/mmcblk0p8: PARTLABEL=“bootloader-dtb” PARTUUID=“068a0ad8-8a2b-4896-a958-fd6315600f4f”
/dev/mmcblk0p9: PARTLABEL=“bootloader-dtb_b” PARTUUID=“52258577-7255-4b39-b39f-59125dcc7a24”
/dev/mmcblk0p10: PARTLABEL=“secure-os” PARTUUID=“5c65cd19-92c8-412a-9a4a-5f6122c87213”
/dev/mmcblk0p11: PARTLABEL=“secure-os_b” PARTUUID=“6853e68e-ee87-4569-94ec-58106f046016”
/dev/mmcblk0p12: PARTLABEL=“eks” PARTUUID=“7fdc74a0-8b9b-42db-a5e6-3d020623a777”
/dev/mmcblk0p13: PARTLABEL=“eks_b” PARTUUID=“7bbe2c05-35a9-43a8-92f1-433c75b06b3c”
/dev/mmcblk0p14: PARTLABEL=“bpmp-fw” PARTUUID=“74955b3e-e5b5-4699-a0ad-cf7da4b71876”
/dev/mmcblk0p15: PARTLABEL=“bpmp-fw_b” PARTUUID=“754509f8-a23c-41bc-a562-f158d014cf7b”
/dev/mmcblk0p16: PARTLABEL=“bpmp-fw-dtb” PARTUUID=“4a532c67-bb4f-4cee-a574-de4adfb1781c”
/dev/mmcblk0p17: PARTLABEL=“bpmp-fw-dtb_b” PARTUUID=“28282da4-14d9-4d38-bc7e-f340bdfa8d04”
/dev/mmcblk0p18: PARTLABEL=“xusb-fw” PARTUUID=“0e62a7a1-c916-4252-a0c2-0018308eb676”
/dev/mmcblk0p19: PARTLABEL=“xusb-fw_b” PARTUUID=“07bcb79e-af74-4859-9f92-160d3e2c9907”
/dev/mmcblk0p20: PARTLABEL=“rce-fw” PARTUUID=“5b353b0f-7984-4f54-844f-407f1467f356”
/dev/mmcblk0p21: PARTLABEL=“rce-fw_b” PARTUUID=“02fcaf2d-4057-4b84-8a17-5f136b0a9277”
/dev/mmcblk0p22: PARTLABEL=“adsp-fw” PARTUUID=“221e260c-c52a-412e-8fc2-aa6d05306317”
/dev/mmcblk0p23: PARTLABEL=“adsp-fw_b” PARTUUID=“22eb6767-2475-469c-9544-3213ce933e6d”
/dev/mmcblk0p24: PARTLABEL=“sce-fw” PARTUUID=“038adfc4-b9bb-4e10-ad45-b709680db32b”
/dev/mmcblk0p25: PARTLABEL=“sce-fw_b” PARTUUID=“3b48ce94-c3e9-4aaa-a508-41303576ab49”
/dev/mmcblk0p26: PARTLABEL=“sc7” PARTUUID=“6cfd8d00-cb05-4841-a504-62409e44ba74”
/dev/mmcblk0p27: PARTLABEL=“sc7_b” PARTUUID=“709b7a79-9704-4d78-9c70-537c88b5d04b”
/dev/mmcblk0p28: PARTLABEL=“BMP” PARTUUID=“5ccd1088-c020-4b93-9d1c-c422b5bfc95f”
/dev/mmcblk0p29: PARTLABEL=“BMP_b” PARTUUID=“37180077-3427-4623-a1ca-5b5784263659”
/dev/mmcblk0p30: PARTLABEL=“recovery” PARTUUID=“4751f951-8c30-4506-8956-9970b8603d6a”
/dev/mmcblk0p31: PARTLABEL=“recovery-dtb” PARTUUID=“0ba2b0a5-9b5e-43cb-87f4-7b5769902d0f”
/dev/mmcblk0p32: PARTLABEL=“kernel-bootctrl” PARTUUID=“61dc5519-3a34-4133-919d-e03aad23251d”
/dev/mmcblk0p33: PARTLABEL=“kernel-bootctrl_b” PARTUUID=“2bddfe1e-a5f7-4b21-a399-d0661e8bdb18”
/dev/mmcblk0p34: PARTLABEL=“kernel” PARTUUID=“336370fc-9e48-4732-bccf-950d76ebfe23”
/dev/mmcblk0p35: PARTLABEL=“kernel_b” PARTUUID=“74ab354d-4098-49e9-bea0-cf6fd5457851”
/dev/mmcblk0p36: PARTLABEL=“kernel-dtb” PARTUUID=“057d00b8-bd9b-4293-8b05-42313001953c”
/dev/mmcblk0p37: PARTLABEL=“kernel-dtb_b” PARTUUID=“48b6f1c2-cfac-489d-b427-cb1514eb0810”
/dev/mmcblk0p38: PARTLABEL=“CPUBL-CFG” PARTUUID=“4da45bdc-7e3d-4664-8c4b-467a820c4759”
/dev/mmcblk0p39: PARTLABEL=“RP1” PARTUUID=“0a30199b-4053-41c2-ab9c-7468b56e0c6c”
/dev/mmcblk0p40: PARTLABEL=“RP2” PARTUUID=“32f57a88-3abd-4355-a292-3109a678d35e”
/dev/mmcblk0p41: PARTLABEL=“RECROOTFS” PARTUUID=“0e76e0b4-2c45-4002-8403-af77b051da41”
/dev/mmcblk0p42: PARTLABEL=“UDA” PARTUUID=“1734ca8e-d380-4544-a63d-d965dbffdf0b”
/dev/nvme0n1: PTUUID=“2631cf6a-a868-4175-bb78-d423c71e19a9” PTTYPE=“gpt”
/dev/nvme0n1p1: LABEL=“xavier_ssd” UUID=“b94950a6-961e-4c2f-82ef-26c895ce7905” TYPE=“ext4” PARTUUID=“09456976-51fb-4847-924b-15ddd9a9515b”
/dev/zram0: UUID=“e06373f6-d4aa-4d03-b3da-6f511055e6c1” TYPE=“swap”
/dev/zram1: UUID=“d66c1211-9bc5-4f6f-83cb-55a8f6939a61” TYPE=“swap”
/dev/zram2: UUID=“30e170b4-4ccb-423d-a5a0-8cf063e3d259” TYPE=“swap”
/dev/zram3: UUID=“7ef0d1f8-ca1b-42fe-9baa-bd6e5c246d40” TYPE=“swap”
/dev/zram4: UUID=“4d73c008-10c3-46f2-b389-c6ebd798dd82” TYPE=“swap”
/dev/zram5: UUID=“42c2616d-d427-4ebd-b9f5-e93bba4d3441” TYPE=“swap”
/dev/zram6: UUID=“58e84371-0d28-4287-9d83-a7aa57d20ed9” TYPE=“swap”
/dev/zram7: UUID=“9d6f4fe0-87d8-41f7-9622-963d17a2fa94” TYPE=“swap”

Can I work around this somehow?

Thanks again!

Your fstab indicates that the system is trying to mount an nvme drive by UUID on /xavier_ssd

I would start off with trying to identify what is being stored in /xavier_ssd on the source system. Understand that anything stored under this directory is not being cloned to the destination system.
If nothing essential is stored on this drive you could simply comment out the “/xavier_ssd” entry from /etc/fstab by prepending a “#” at the beginning of that line.

/dev/root / ext4 defaults 0 1

#UUID=b94950a6-961e-4c2f-82ef-26c895ce7905 /xavier_ssd ext4 defaults 0 2

Save and reboot the source system to confirm everything still works before making a new clone. And keep a backup of your previous image just in case.

If the destination system has an nvme drive. You could potentially edit the xavier_ssd entry in fstab to mount /dev/nvme0n1p1 instead of using UUID. However, this will also be a problem on destination devices if their nvme drive is not already partitioned and prepared with a filesystem.

Hi, happy new year!

I replaced the UUID with /dev/nvme0n1p1 and it now does not boot. I have way to recover it and I will.
The thing is that the /xavier_ssd seems to be mounted onto / and there appears to be a cyclic mount too, as /xavier_sdd contains another xavier_ssd directory that looks again like the / fire system…

Once I get it back online I will let you know for sure.
Thanks again for all you help! Much appreciated!