Hi,
As I don’t have a separate host pc having ubuntu 20.04 in my current environment I am working
Can I use another jetson AgX xavier itself as host pc for backup and restoring another Jetson AgX xavier.
Is it feasible and possible??
Pls confirm.
Hi,
As I don’t have a separate host pc having ubuntu 20.04 in my current environment I am working
Can I use another jetson AgX xavier itself as host pc for backup and restoring another Jetson AgX xavier.
Is it feasible and possible??
Pls confirm.
No.
In recovery mode Jetsons are custom USB devices, and thus require a custom driver (recovery mode does not produce a mass storage device). The driver which is used in flash is a desktop Linux PC compiled executable format and cannot run on arm64.
You mean the host pc should compulsory be desktop based linux ubuntu 20.04 X86 machine but not an ARM device at any cost??
I am able to successfully backup the eMMC data of Jetson AgX xavier on one of the ubuntu 20.04 host pc.
But the same backup is not working fully on another host pc with ubuntu 20.04.
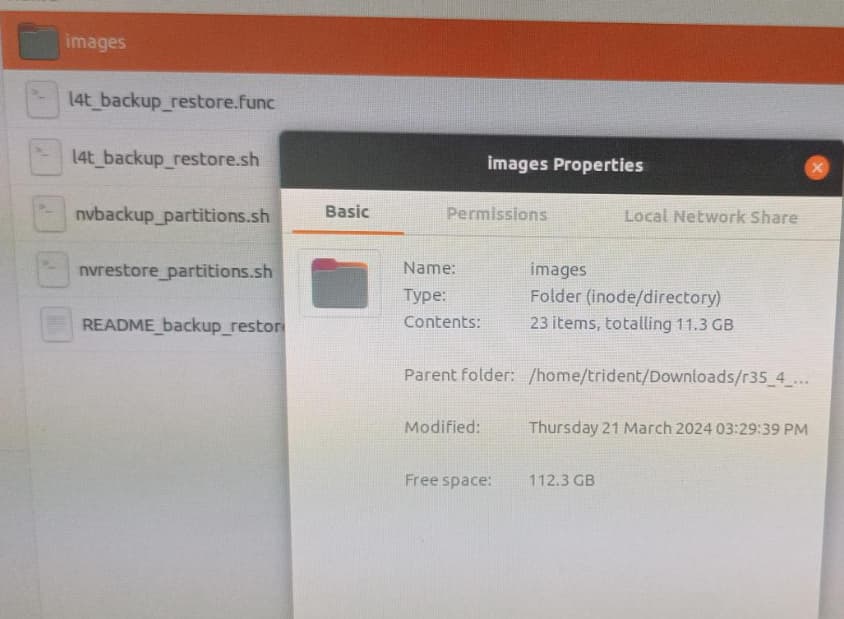
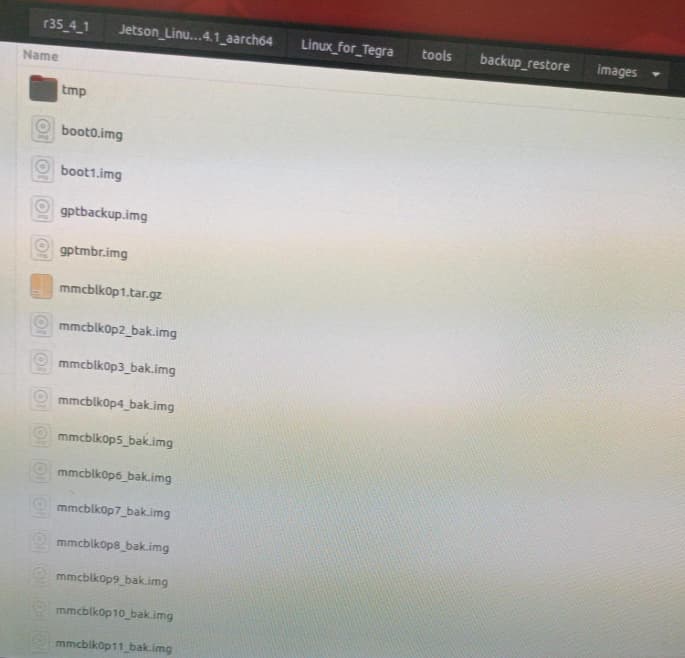
It is able to generate all the .img files within in the Image folder under back and restore folder.
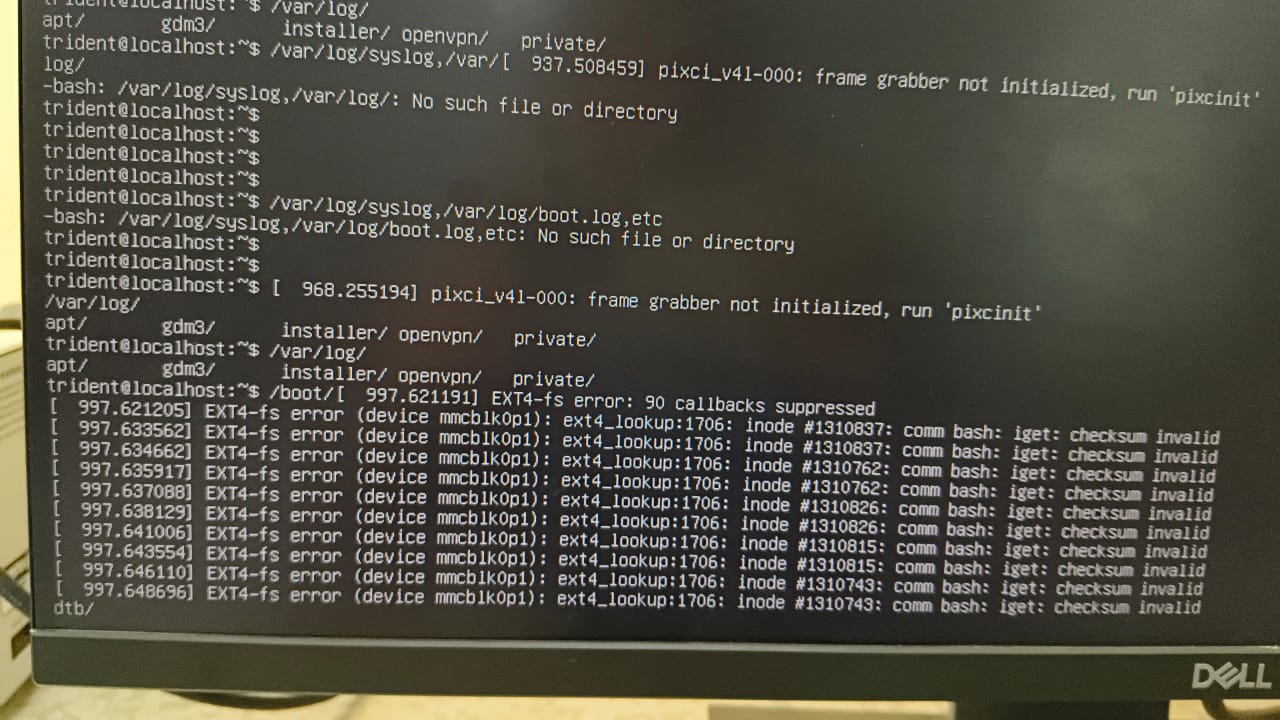
But it stops half way mid saying “no device found”
Only difference between these two host pcs is both have slightly different kernel version.
One it 5.10.15 another is 5.10.9 …
Pls let me know is there any specific requirements for host pc to be used for successful backup and restore of Jetson AgX xavier.
That is correct. The program runs in a desktop PC architecture using a Linux kernel. Command line has a lot wider range of versions of Linux which work, but the GUI part of it restricts to Ubuntu, and depending on the release being flashed, this also restricts which release of Ubuntu. The Xavier has a wide range of available releases, see here (L4T release is the combination of Ubuntu and NVIDIA drivers):
https://developer.nvidia.com/linux-tegra
See documents for the particular release to know which Ubuntu hosts the particular flash can use if not using command line. If you can show the output of “head -n 1 /etc/nv_tegra_release”, then more details would be available.
What is the exact byte size of your backup? How was the backup made? There are a lot of different ways a backup can be used for restore. I assume you are using the backup and restore script, but there are more direct methods for eMMC.
So far as the device not being found, are you using a VM on the host PC? VMs have their own issues because they tend to lose USB during flash operations. During flash operations a Jetson will disconnect and reconnect on the USB, and VMs must be specifically configured to reconnect. Incidentally, USB is hot plug, and so sometimes simply unplugging and replugging when it gets to that point would do the job.
One more thing is , the host pc where backup and restore not working fully( using flash script command) does not has the GNOME(GUI). Due to some reasons, it has gone.
Is this might be the reason for backup not working correctly ?? and stopping half way through once image files are copied to the IMAGE folder from the Jetson device during this backup command execution process.
I am backing up Jetpack 5.1.2 version present on my jetson agx xavier on to my host pc using backup&restore script . Host pc ubuntu version is 20.04( but here GNOME is not working - am able to open only virtual consoles using ALT+F2 key) and i executed backup flash command on this virtual console only.
Looks like we need to execute Backup and restore shell script command in the terminal only and not on virtual console to make it work?? pls confirm.
around 11 GB.Backup was made using backup and restore script command as shown below:
but the command was not fully successful, it ended abruptly saying no device found or something.
Pls find the log attached here…
temp_Log_backup_script.txt (66.0 KB)
$ sudo ./tools/backup_restore/l4t_backup_restore.sh -e mmcblk0 -b jetson-agx-xavier-industrial
The log where it was fully successful with the backup shell script execution is attached below:
Backup_Cloning_log.txt (82.8 KB)
not virtual machine.
I was using Virtual console by pressing ALT+F2 key as the GNOME is lost on that host pc.
ALT+F2 is not a “virtual console” per se, it is a local console. This is normally text mode console. In fact, most consoles are text mode. Usually only one is GUI. Is there a reason you did not bring up a text console within the GUI instead of using ALT+F2? Regardless, the GUI methods of working with JetPack/SDK Manager will fail in a text console, but there are command line methods that would still work. Gnome going away with ALT+F2 is a system that works normally (or if in the GUI maybe CTRL+ALT+F2; one leaves out the CTRL when already not in a GUI). Most of the scripts ending with .sh for tasks like backup and restore will not care about a GUI or command line. If this were to cause failure, then it would be immediate failure. The backup/restore mechanism failure is likely unrelated to this.
Ubuntu 20.04 works well with JetPack 5.x (L4T R35.x). Don’t use ALT+F2 (or CTRL+ALT+F2) and you won’t lose the GUI/Gnome. It should boot to the GUI as is, and you can reach a command line via an app. In reality a regular terminal and a pseudo tty terminal will behave the same way if the application being run is a text mode application. In the case of a GUI application, then it is entirely a matter of whether or not the terminal environment variable for DISPLAY is correctly set to an associated GUI (text mode forwards to that GUI if it is set…try experimenting with “echo $DISPLAY” in a GUI terminal and in a text terminal not part of the GUI).
Again, I don’t think the virtual console concept matters. A virtual machine is a very different beast.
Are you certain your host PC has enough disk space? What do you see from “df -H -T”? The rootfs partition takes a lot of disk space. It also matters if your system has an external memory device like an NVMe, or if it just runs on the eMMC. eMMC is much easier to deal with IMHO.
The host pc which i was using at customer site, there was some issue for Gnome/GUI coming up. It has gone bad and the machine directly boots to the console mode always.
Sorry. In the host PC GNOME does not come at all, it boots directly to the console always. As the customer were trying to install some software’s called twinkle( which I dont have any idea!) the GNOME/GUI got vanished and from then on, that host pc always boots to the console mode it seems.
ok. Thanks for the confirmation.
what is the difference between regular terminal and a pseudo tty terminal?
I will try this next time, i visit customer site next week.
ok.Even i have some vague idea about it.
The host pc has lot of free memory space around 800 GB RAM and 1.5 TB hard disk.
Here system means are you referring to host pc or jetson agx xavier??
Actually I need to back and restore eMMC first and then followed by NVMe of the Jetson agx xavier device.
As my root file system is mounted on NVMe and eMMC has .boot loader files for initial booting…
Regular terminals are always directly connected. Examples: “/dev/tty0”, “/dev/tty1” (probably from ALT+F2 and friends). Pseudo terminals are not directly hardware related. This are software emulations. When you run an application in a GUI environment that has an emulation, you get something like “/dev/pty0”, “/dev/pty1”. These “softare” emulations of a terminal do pass through key binding events and run the same as a keyboard on something like a USB or some antique connector. When you log in remotely via ssh, since this is virtual this also is a pseudo terminal/tty. Functionally they are not different. A virtual machine is 100% in software and being hosted. A virtual terminal is hosted by a parent app.
Since you don’t have a running GUI on the system you won’t be able to use any $DISPLAY.
You’re not using a VM, so don’t worry about that part. We see a lot of USB errors though on these forums, and an enormous number of them are from VM users who do not know that a VM is not the same as a full computer. Parts can be made to behave correctly, but that’s a VM configuration for those people which is out of the control of the Jetson software.
The disk space I refer to is the host PC. If the Jetson has a 28 GB partition, then it will clone both an exact 28 GB bit-for-bit match (raw clone), and it will also produce a “sparse” clone. The sparse clone is almost the same as the raw, but it excludes the content on the partition which is empty. As the content of the partition fills and approaches maximum capacity, then sparse clone size approaches the size of the raw clone. Essentially you can consume twice the space of the partition during a clone (this is also why cloning takes so long). A 28 GB partition, if full, would consume 56 GB on the host PC. Then, if you clone or copy anything else, or install software, this adds to what is consumed. The command “df -H .” (the “.” is important, it is an alias for “the current directory”) will tell you what the disk availability is where you are currently located, e.g., in the “Linux_for_Tegra/” directory (and if that is part of a given partition, then that same answer is true for any location within the partition). You have a large disk, but how much space is free on that partition?
With an external device you probably need to use the scripts from NVIDIA. This gets rather complicated to do in pieces. Backup and restore of just the rootfs partition is simple enough, but it isn’t the whole story. Command line of rootfs backup for a dev kit (keep in mind I don’t know if your AGX Xavier is a dev kit from NVIDIA or if it uses a third party carrier board; also, this runs from the Linux_for_Tegra/ directory):
sudo ./flash.sh -r -k APP -G rootfs_backup.img jetson-agx-xavier-devkit mmcblk0p1
Before you start any restore you really must know what L4T release is being used. See “head -n 1 /etc/nv_tegra_release”. You can go here to get that exact release and documents:
https://developer.nvidia.com/linux-tegra
There are very good reasons to use that same exact release in the flash software when manually running it. I’ll give hints why later on. L4T itself is what gets flashed, and is just Ubuntu plus NVIDIA drivers.
You could create a log of that backup command like this (useful if you need to get support; can be attached to the forum):
sudo ./flash.sh -r -k APP -G rootfs_backup.img jetson-agx-xavier-devkit mmcblk0p1 2>&1 | tee log_emmc_clone.txt
To restore just that rootfs one would place a copy (this is an enormous file, this takes a lot of time just to copy the file) in “Linux_for_Tegra/bootloader/”, and rename it “system.img”. Then you’d flash like this (which also takes a lot longer than normal because it is raw and not sparse):
sudo ./flash.sh -r jetson-agx-xavier-devkit mmcblk0p1
Again, this could be logged for forum support:
sudo ./flash.sh -r jetson-agx-xavier-devkit mmcblk0p1 2>&1 | tee log_restore.txt
These operations take a lot of time due to size of data going over USB. I recommend you just log them in case you need it.
This does not clone or back up the non-rootfs partitions. However, this latter restore operation will restore all of the non-rootfs content. That content does not normally change, and if you had that release before, then there is no need to clone that other content…simply restore with the same content. In your case though there are complications.
The external disk storage requires special boot preparation. This means that restoring the way I mentioned can put non-rootfs content in which does not work with external boot. This is why the backup and restore script exists…to deal with external media. Backing up the eMMC though is not going to hurt anything, and it is rather important content. There are ways to back up the NVMe if you can mount it on the host PC.
If you have the NVMe on an external host (presumably you’ve removed it from the Jetson and put it on the Linux host PC), and if you have enough disk space to copy an entire NVMe, one can use the dd tool to directly clone individual partitions or entire NVMe disks. The backup script (the backup_and_restore script, not the commands I showed earlier) will do the right thing if they work, so try that for backup before you use the other methods. However, moving the NVMe to the host PC lets you run the command “lsblk -f” to see which disk it is, and perhaps individual partitions. If you will restore to another disk of the exact same size, just clone the whole disk. I’m going to assume that the NVMe has number “nvme1n1” instead of “nvme0n1” (I’m assuming the host PC has an NVMe already; if you get the wrong one you can destroy data on both host and NVMe), and I am assuming the host has enough room:
sudo dd if=/dev/nvme1n1 of=backup_nvme.img bs=100M status=progress
(this might take hours)
So it is possible to manually backup the eMMC. And to also manually back up the NVMe. It is less complicated if the backup script does this. Restore with the script will restore everything correctly. Restoring manually with the eMMC and NVMe individual backups will not be simple (but it will save everything you need and make surviving failure possible). Remember all that content in partitions of eMMC which are not rootfs? That’s where some of the changes go to boot external content. There is also an initrd involved which might be located in different locations and I can’t guarantee you’d get that partition or file correct when manually backing up pieces. You could restore from this, but it would take work and a learning curve. The backup and restore script has all you need in the README file.
Regarding the part where I said you need to know which L4T release was used and to use that same release: If you had JetPack/SDK Manager, then you’d just start it like this to get the correct release:
sdkmanager --archived-versions
However, you can’t use JetPack/SDK Manager (which is just a front end to the command line anyway) since you don’t have a GUI. Here is how you’d install the command line environment if you don’t already have it; go to the URL for your L4T release, and then download:
Then, in an empty location, unpack the driver package as a regular user. Do not use sudo or root login.
This produces the “Linux_for_Tegra/” subdirectory. Within that go to the “rootfs/” subdirectory (“Linux_for_Tegra/rootfs/”). Unpack the sample root filesystem with sudo.
Now go back to “Linux_for_Tegra/”. Run this command:
sudo ./apply_binaries.sh
This location is now ready for any command line flash or restore. You don’t need to repeat that. The “flash.sh” script and the backup and restore content is part of the driver package.
I must warn you that even if you know what you are doing this might exceed a one day task. You really must start by knowing if you have enough free space after you have the driver package and rootfs installed. You should try the backup and restore script first. If you cannot do that, then you can clone the eMMC as shown above (incidentally, the Jetson must be in recovery mode to clone anything). If the backup script fails and you use the dd method to back up the NVMe, then back that up and back up eMMC before you ever try to clone anything.
The whole flashing process relies on a lof of NVIDIA proprietary binaries, which are only available for x86_64.
I did not execute this command before executing backup sh script as this was not documented in the backup and restore txt file.
Might be this is the reason for backup stopping abruptly in the middle.
We are planning to create a Host pc freshly from scratch by installing ubuntu 20.04 tmrw on a x86_64 by formatting and try out backup and restore of Jetson agx xavier by script execution at customer site.
Also I have tarred the entire BSP for release35-4-1 from my working host PC at out site and copying this to the new host pc at customer site.
Is this fine, or should we install something else to create a successful host environment which should have Nvidia proprietary binaries at host site so that back and restore works fine?
Read the document, please:
https://docs.nvidia.com/jetson/archives/r35.5.0/DeveloperGuide/IN/QuickStart.html
sudo ./tools/l4t_flash_prerequisites.sh
Thanks for the reference.
I have been doing flashing from.past 6 months successfully on host pc setup by some one else.
Now that we need to setup a fresh hostpc…I am cross checking if we are missing any settings or. configuration to.be done before starting flashing or backup commands.
I read the below. environment variables to be set, but cannot find clear steps properly. It refers to the tar files instead of the untarred folder names.
Please confirm how to permanently export environment variables so that they are retained even after rebooting.
Environment Variables
Your host system must be configured to set certain environment variables:
${L4T_RELEASE_PACKAGE}contains the name of the Jetson Linux release package:Jetson_Linux_<version>_aarch64.tbz2.${SAMPLE_FS_PACKAGE}contains the name of the sample file system package:Tegra_Linux_Sample-Root-Filesystem_<version>_aarch64.tbz2.${BOARD}contains the name of a supported configuration of Jetson module and the carrier board. Common values for this field can be found in the Configuration column in the Jetson Modules and Configurations table.
Export them in your ~/.bashrc or any other shell config file.
Do some basic Googling before asking, bro… This is not even related to Jetson at all.
Sorry. I know exporting is done using EXPORT command also have idea of putting them in some file like bashrc also.
I was asking the path name has to be to the .tar files or untarred folder names?
It’s not.clear in the documentation
Of course they refer to the tarballs.
It’s clear:
${L4T_RELEASE_PACKAGE}contains the name of the Jetson Linux release package:Jetson_Linux_<version>_aarch64.tbz2.${SAMPLE_FS_PACKAGE}contains the name of the sample file system package:Tegra_Linux_Sample-Root-Filesystem_<version>_aarch64.tbz2
Oh ok fine. Thanks for confirming.
That command is for setting up the root filesystem during a normal flash. It is likely that the backup and restore scripts do not use that content, but I won’t guarantee that it doesn’t do any housekeeping. During backup this would have nothing to do with it should backup halt. Possibly, but unlikely this would have an effect on restore. Even so, I would recommend doing this if you are using that software via manual install to the PC.
The partition binaries for eMMC models (and QSPI content) are part of that release’s flash. When you flash normally, or when you flash normally other than reusing a given rootfs image, then all of that other binary content is part of the flash. If you purposely flash just the rootfs (which goes beyond “reusing the rootfs image”), then only the rootfs is updated.
Backup and restore can work with other parts of the binary content, and is more extensive than just backup and restore of the rootfs. However, it is the rootfs which contains the operating system and data. Everything else is mostly booting. A serial console boot log is how you differentiate which stage has a failure (and remember that booting sets up an environment for the rootfs to run in…one can have a correct boot, but the rootfs might fail if the environment is from the wrong release).
The boot content in the locations outside of the rootfs mostly works with everything in a given major release unless it has a bug fix. Consider that most of the L4T R35.x rootfs content will work with the binary boot content of other R35.x releases (though bug fixes might get in the way if content is too old); consider that L4T R35.x rootfs content is guaranteed to fail with all L4T R36.x rootfs. Should you install R35.4.1 flash software manually on your host PC, and if you have a rootfs preserved from a Jetson that had R35.4.1, then you don’t need to preserve that non-rootfs binary content. Exceptions might exist if you’ve customized it.
Consider this use-case: Your boot content is corrupt, but you have a proper rootfs image. If you flash all new content, except that you reuse rootfs, and the flash software is from the same release, then the corrupted boot content would be fixed.
Another use-case: Your boot content is not corrupt, and you have a proper rootfs image, but you are not restoring to the same Jetson. If you reuse the rootfs, but otherwise perform a complete flash using the same L4T release for flash software, then the new unit will get a matching and working boot content despite having arrived empty.
Another use-case: Your boot content is corrupt or the wrong release. You have a backup rootfs. You have a backup of all of the binary non-rootfs content. If you reuse the full non-rootfs content, all units flashed will fail. If you use a default flash, but otherwise it is set to reuse your backup rootfs image, then the corrupt content is replaced and it should work.
Complications and customization tend to matter when you use an initrd boot to adapt to external rootfs media. Some adaptation must be made for properly booting into the rootfs on external media. The default binary content is not for external boot.