Depth Image Has Striations - How to debug this effectively?

Hi, I have been working on learning OptiX to hopefully use in a research project I am in. I have been going through the Siggraph Optix7 Course trying to understand the pipeline layout. Keep in mind I don’t have a lot of experience with C++ and even less with CUDA so some of these questions might be less about OptiX but please bear with me as I am trying to sort through everything.

First a little bit about what I want to do. I want to load in an elevation map(as mesh) and then render both color and depth values from it. Eventually I want to be able to render several sparse images from different view points rather than a single dense image from a single view point(working now).

I worked up through example 7 in the Siggraph course which explains how to import a mesh from a file and render it. I then started to diverge a little and started to work on the depth rendering. For this I consulted the OptixSDK example “RayCasting”. In the RayCasting example the depth is retrieved through the function optixGetRayTMax() and is defined as a const unsigned int as seen here:

extern "C" __global__ void __closesthit__buffer_hit()
{
    const unsigned int t = optixGetRayTmax();

    whitted::HitGroupData* rt_data = (whitted::HitGroupData*)optixGetSbtDataPointer();
    LocalGeometry          geom    = getLocalGeometry( rt_data->geometry_data );

    // Set the hit data
    optixSetPayload_0( __float_as_uint( t ) );
    optixSetPayload_1( __float_as_uint( geom.N.x ) );
    optixSetPayload_2( __float_as_uint( geom.N.y ) );
    optixSetPayload_3( __float_as_uint( geom.N.z ) );
}

I tried implementing something similar in my modified version of the CH program. I have tried two different ways:

  1. I changed my vec3f to vec4f and appended the depth to end.
  2. I set up a new payload and implemented the depth just like the RayCasting example.

  extern "C" __global__ void __closesthit__radiance()
  {
    const TriangleMeshSBTData &sbtData 
      = *(const TriangleMeshSBTData*)optixGetSbtDataPointer();
    // get depth
    const uint32_t t = optixGetRayTmax();

    // vec3f &prd = *(vec3f*)getPRD<vec3f>();
    vec4f &prd = *(vec4f*)getPRD<vec4f>();

    prd[0] = sbtData.color[0];
    prd[1] = sbtData.color[1];
    prd[2] = sbtDatacolor[2];
    prd[3] = t;
  }

Then when placing the value in the buffer I extracted if from the vec4f and saved it to a separate depth buffer, following the syntax of the original example. Instead of the rgb values, I set all the values to depth(this rendered a white depth image instead of a red one). I also again, tried doing this just like the RayCasting example

Modified from the Optix 7 Siggraph Course

    vec4f pixelColorPRD = vec4f(0.f);

    // the values we store the PRD pointer in:
    uint32_t u0, u1, u2;
    packPointer( &pixelColorPRD, u0, u1 );

    optixTrace(optixLaunchParams.traversable,
                camera.position,
                rayDir,
                0.f, //t_min
                1e2f, //t_max
                0.0f, // rayTime
                OptixVisibilityMask( 255 ),
                OPTIX_RAY_FLAG_DISABLE_ANYHIT, // OPTIX_RAY_FLAG_NONE,
                SURFACE_RAY_TYPE,               // SBT Offset
                RAY_TYPE_COUNT,                 // SBT Stride
                SURFACE_RAY_TYPE,               // miss SBT Index
                u0, u1 );
    
    const int r = int(255.99f*pixelColorPRD.x);
    const int g = int(255.99f*pixelColorPRD.y);
    const int b = int(255.99f*pixelColorPRD.z);
    const int d = int(pixelColorPRD.w);


    // convert to 32-bit rgba value (we explicitly set alpha to 0xff
    // to make stb_image_write happy ...
    const uint32_t rgba = 0xff000000
      | (r<<0) | (g<<8) | (b<<16);

    const uint32_t depth = 0xff000000 
      | (d<<0) | (d<<8) | (d<<16);

    // and write to frame buffer ...
    const uint32_t fbIndex = ix+iy*optixLaunchParams.frame.size.x;
    optixLaunchParams.frame.colorBuffer[fbIndex] = rgba;
    optixLaunchParams.frame.depthBuffer[fbIndex] = depth;

Following the RayCasting Example:

    optixTrace(optixLaunchParams.traversable,
                camera.position,
                rayDir,
                0.f, //t_min
                1e2f, //t_max
                0.0f, // rayTime
                OptixVisibilityMask( 255 ),
                OPTIX_RAY_FLAG_DISABLE_ANYHIT, // OPTIX_RAY_FLAG_NONE,
                SURFACE_RAY_TYPE,               // SBT Offset
                RAY_TYPE_COUNT,                 // SBT Stride
                SURFACE_RAY_TYPE,               // miss SBT Index
                u0, u1, u2);
    
    const int r = int(255.99f*pixelColorPRD.x);
    const int g = int(255.99f*pixelColorPRD.y);
    const int b = int(255.99f*pixelColorPRD.z);
    const float depth = __uint_as_float( u2 );

    // convert to 32-bit rgba value (we explicitly set alpha to 0xff
    // to make stb_image_write happy ...
    const uint32_t rgba = 0xff000000
      | (r<<0) | (g<<8) | (b<<16);

    // and write to frame buffer ...
    const uint32_t fbIndex = ix+iy*optixLaunchParams.frame.size.x;
    optixLaunchParams.frame.colorBuffer[fbIndex] = rgba;
    optixLaunchParams.frame.depthBuffer[fbIndex] = depth;
  }

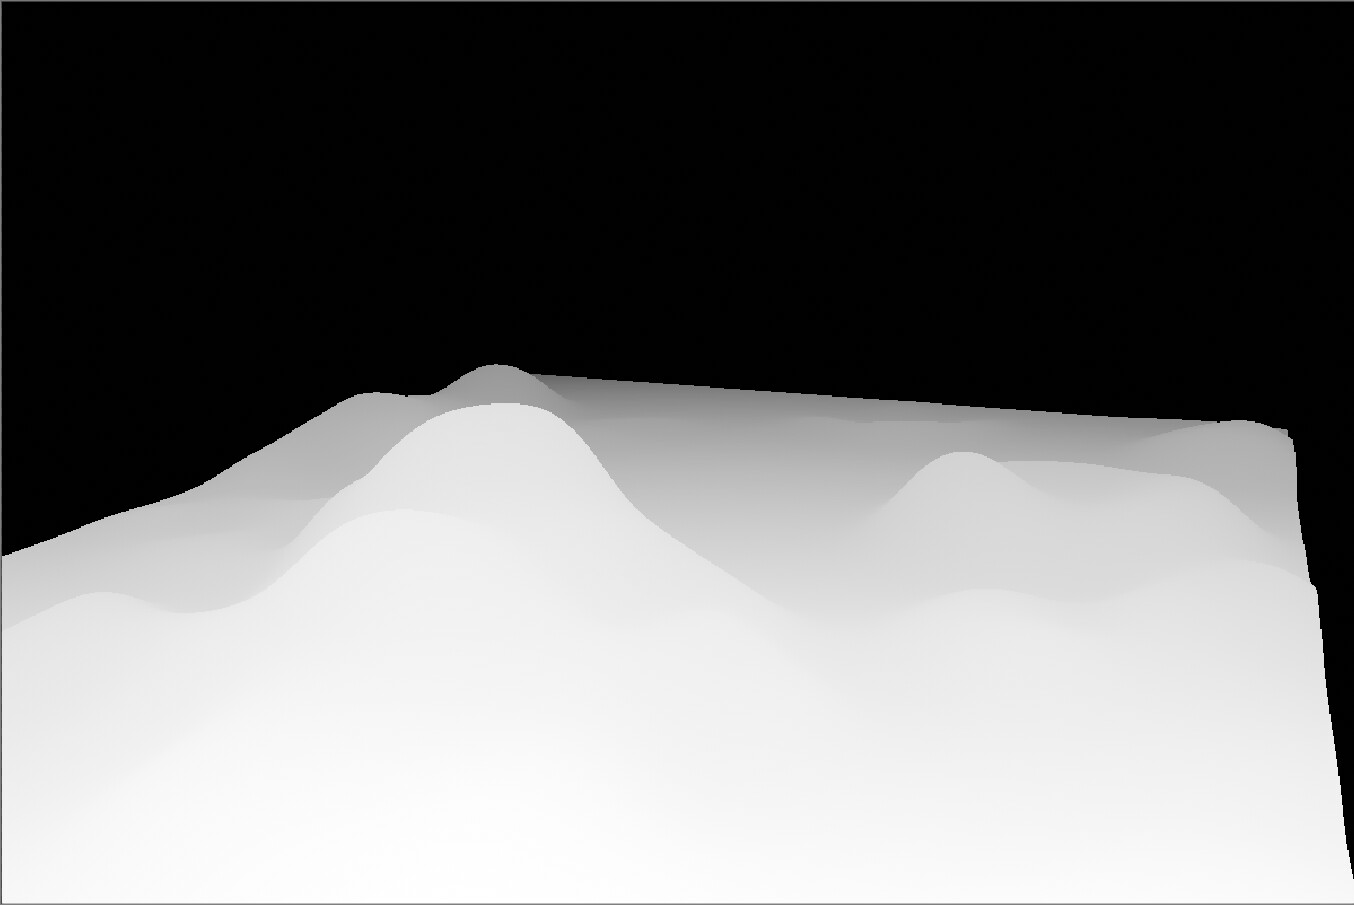
This works to render a depth image. However, there striations present in the image. I guess these are due to some kind clipping in the depth values from the way they are being send back to the host?

I can also render an image when following the RayCasting Example, but it gives a red hued image. I think I partially understand why, but I also have no experience in OpenGL so I was unable to figure out how to render just one channel.

So I have been trying understand where these striations are coming from. My first thought is had something to do with going back and forth between int and float, but I just don’t have enough experience in this yet to really understand what is going on in each conversion. I wanted to see if I could inspect the data directly, but was having trouble even just printing values to the terminal. I finally figured out to save the image to a file, instead of a rendering to a window. However, I can only save the rgb image and not the depth image. The rgb image saves upside down(probably easy to fix), but the depths just shows a bunch of squares like an invisible layer. While debugging this, I tried changing the call to optixGetRayTMax() and defined it as const float t = optixGetRayTMax() ; To my surprise, this seemed to get rid of the striations.

I am not sure if I am just not wanting to see them, or they are not there, but it seems better. However, can you explain why this would be the case? I am really hoping to develop a better understanding/intuition about these seemingly simple questions.
Is there a better way to get the depth? As I mentioned previously, I eventually want to be able to render a bunch of sparse images from various points, so I want to make sure I am setting this up in an efficient manner.

Finally, can you point me to any documentation or instructions on how to set up a good debugging environment for Optix? I am using VSCode to write everything and build with Cmake.

I am on Ubuntu 20.04, Optix 7.7(I have 8 too, but have done most of the work in 7.7). CUDA 11.8, Nvidia 3080.

Thank you!
Benjamin

For this I consulted the OptixSDK example “RayCasting”. In the RayCasting example the depth is retrieved through the function optixGetRayTMax() and is defined as a const unsigned int

Unfortunately exactly that specific example code is incorrect.

// const unsigned int t = optixGetRayTmax(); // This is just wrong.
const float t = optixGetRayTmax(); // This is the correct thing to do!
...
optixSetPayload_0( __float_as_uint( t ) ); // t is assumed to be a float type here.

It’s fixed internally and will be corrected with the next OptiX SDK release.

It’s working in that optixRaycasting example by chance, because the shading code looks only at the sign of the distance and that is cleared when hit (because the closest hit tmax must always be positive and the assignment to the wrong unsigned int type would clear the sign bit anyways) and set to negative when missed.
See the optixSetPayload_0( __float_as_uint( -1.0f ) ); inside the miss program and the if( hits[idx].t < 0.0f ) inside the shadeHitsKernel().

While debugging this, I tried changing the call to optixGetRayTMax() and defined it as const float t = optixGetRayTMax() ; To my surprise, this seemed to get rid of the striations.

Correct!
https://raytracing-docs.nvidia.com/optix8/guide/index.html#device_side_functions#ray-information

optixGetRayTmax() returns the floating point ray tmax value along the ray direction vector.

The initial tmax is set inside the optixTrace call and, together with the ray tmin value, defines the [tmin, tmax] interval along the ray in which intersections with geometry should be checked.
The intersection programs then shrink that tmax vale for each intersection until the closest hit is found (or an anyhit program calls optixTerminateRay())

  1. I changed my vec3f to vec4f and appended the depth to end.
 // vec3f &prd = *(vec3f*)getPRD<vec3f>();
    vec4f &prd = *(vec4f*)getPRD<vec4f>();

    prd[0] = sbtData.color[0];
    prd[1] = sbtData.color[1];
    prd[2] = sbtDatacolor[2];
    prd[3] = t;

Note that you cannot simply change the number of payloads you read and write inside the OptiX device *.cu files only!
You also must set the correct amount of payload registers inside the OptixPipelineCompileOptions numPayloadValues accordingly.
You might want to enable OptiX’ validation mode and add a logger callback (only during debugging because this costs performance!) which should be able to catch such errors.

(You’re missing a selection operator in this line. This posted code shouldn’t compile.)

If t is a float that is fine.

Then when placing the value in the buffer I extracted if from the vec4f and saved it to a separate depth buffer, following the syntax of the original example.

However, there striations present in the image. I guess these are due to some kind clipping in the depth values from the way they are being send back to the host?

If you only store one channel, that is usually interpreted by image viewers as the red channel, so that would explain your red screenshots.

When writing out the floating point intersection distance values into an image, some care would need to be taken, because the range of the distance values is not limited! (Well, it’s limited to what you used as maximum ray tmax in your optixTrace calls.)

So if you store these floating point values into some image file format which only supports a limited amount of bits like that RGBA8 format used in some OptiX SDK examples, you cannot simply write the original depth when that has values outside the unsigned byte range [0, 255] but would need to scale them to get a more reasonable result shown in image viewers.

So the banding you see in the grey depth image is most likely due to the quantization of a continuous floating point distance to discrete values in an integer format of the destination image channels. (Or you’re still using the unsigned int type for the distance values.)

You would need to consider how you want the distance be scaled for visualization. That your missed pixels are full white means they are the farthest away. probably well outside [0, 255] range of unsigned byte channels.
If you want to keep that image format (instead of HDR), then you could scale the hit distance results before writing it into the image so that the nearest distance is 0.0f and the farthest distance is 1.0f, then scale that to the byte image range [0, 255].
That way you would have the full possible 256 values for the depth visualization and the nearest point would be black and the farthest would be white, or inverse that for more pleasing visualizations.

The much simpler and more accurate way would be to store the image into some format which supports higher channel resolutions, e.g. *.hdr images can be RGBA_FP32, so full floating point 32 bit values per channel. Means you can simply store the RGB and Distance values directly.

The STB library used inside Ingo’s sources is already writing out 4-channel images already. There are stbi_write_hdr() functions.
Mind that when storing the distance values into the alpha channel, that would result in some transparency effects in some image viewers.
GIMP would be a free program which can view these, including all RGBA channels individually.

In case you need any of these distance values for compositing with other results, note that these intersection distances are the radial distances to the camera. This is not the same as the depth values inside a rasterizer which are planar to the camera plane.
https://forums.developer.nvidia.com/t/saving-optixvolumeviewer-depth/266436/5

The rgb image saves upside down(probably easy to fix

Inside the OptiX SDK and many other examples, the launch indices are usually using a lower-left origin, which means the lower addresses inside the output buffer are at the lower-left origin which matches the OpenGL image layout, so this is convenient for the display.
https://forums.developer.nvidia.com/t/optixtriangle-how-to-shoot-rays-to-specific-set-of-co-ordinates/295901/2
If your image format uses a upper left origin layout you would need to flip the camera or the image:
https://forums.developer.nvidia.com/t/flip-device-image-buffer-vertically-and-horizontally/259106

If you experience problems with any of the original optix7course examples, please raise them as issue inside the github repository. These are Ingo Wald’s personal examples (note the copyright).

@droettger Thank you for the detailed response. There is a lot of good information to parse through here. I am not sure about the code that should not have compiled, it is possible that I accidentally posted a line that was in between trying different versions. I have decided to leave it as in my last attempt where it is defined as float and put into its own payload for now. I think it could be done in the vector format in the future, but I want to focus on other parts of the pipeline such as setting up multiple cameras. It seems this has been covered a fair amount on the forum, but I am sure I will still have questions :) Thanks again for the support!

Cheers,
Benjamin

I think I found at least one issue with what I was doing. In my LaunchParams, my depthBuffer was an uint32_t*. I defined it this way because I was thinking that payload values need to be defined as uint. I thought I read this somewhere, but I could have been confused what I was reading. In any case, I changed it to a float*. It seems to be giving reasonable results. I am honestly not sure why it worked at all before. All the values were showing as 0 or very near 0. Like 1.5e-43. I did as you mentioned and used the HDR writer. I also tried to do a little normalizing and invert the blacks and whites. I also updated my miss value to be at the high end instead of -1.f.

Thanks again for the help. It is slowly beginning to make more sense :)

Cheers,
Benjamin

You can use “__float_as_int(t)” to store a float in the payload:

    float t = 1.234f;
    unsigned int i = __float_as_int(t);
    optixSetPayload_0( static_cast<uint32_t>( i ) );

And when loading it back “__int_as_float” ;

   const uint32_t u0 = optixGetPayload_0();
   float t =  __int_as_float(u0);

More precisely, as I explained already further up in that thread, please use __float_as_uint() and __uint_as_float() intrinsics to reinterpret the bits in that case because the payloads are of type unsigned int.

There is also no need for that static_cast<uint32_t> in that code.

1 Like