Draw on any wall : meet Preste AI whiteboard
Today I’m going to describe a fun project we built at Preste , using Nvidia Jetson Xavier NX, Deep Learning and Computer Vision .
In the past months, many professional interactions have moved online : meetings, presentations or courses. Often, one needs to emphasize ideas with visual support or short diagrams, but it is not always easy to do so with a computer mouse. And not everyone has a graphics tablet.
So we came up with an idea of how to solve this problem : we transformed any wall or flat surface into an interactive whiteboard, using an ordinary RGB camera and… one’s hand.
Here is how we did this.
Research stage
Looking for ways to implement this idea, we made the assumption that the easiest way to control our AI whiteboard would be to use fingertips and choose the following finger combinations for control:

Then we looked for solutions like hand and/or fingertips detectors that would help us implement the system quickly and efficiently. After a short exploration, good candidates were found:
- Finger Detection and Tracking
- Handtracking
- Unified Gesture and Fingertip Detection
- Light Hand Detector
- Fingerpose
During the analysis and testing of different options, we decided to break the pipeline into 3 main stages:
- Hand detection in an image
- Fingertips localization
- Interaction with a whiteboard
Detection
As a hand detector, we chose to favor neural network because it has more flexible capabilities than classical methods of detecting/tracking objects, although the latter methods are usually faster than neural networks (but we will see later how to deal with the speed factor). So as a hand detector we decided to use a pretrained YOLO convolutional neural network [1, 3] from Unified Gesture and Fingertip Detection.
To complete the pipeline, we used a pretrained modified VGG16 convolutional neural network [1] as a fingertips detector from Unified Gesture and Fingertip Detection, as it is one of the best available accurate solutions.
Hardware
As our main component we used the NVIDIA Jetson Xavier NX with a Raspberry Pi camera , a combination we already master at Preste, thanks to several successful projects . Detailed instructions for setting up the device can be found here (JetPack 4.4 is used). We also leveraged Tensorflow 1.15.3.
Therefore, our basic AI whiteboard starting pack included:

The last step needed to run our first prototype was to implement the various interactions with the AI whiteboard, ie processing the output from the fingertips detector. All the codes and instructions are available on Github.
Intermediate Results
We were then ready to launch our prototype, and obtained the following first results :

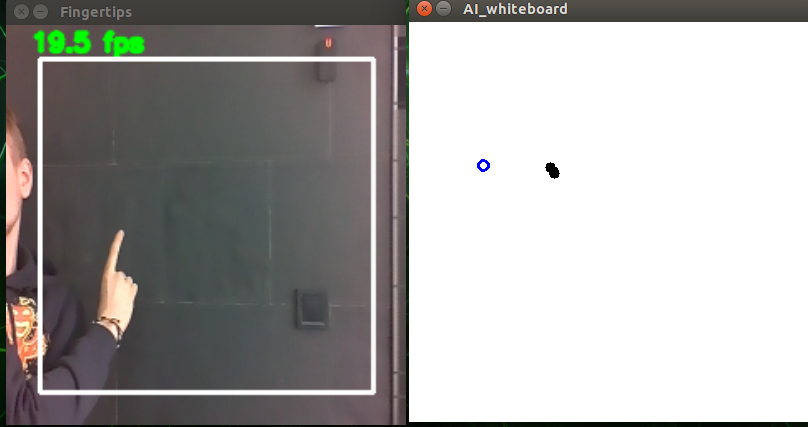
Preliminary results
As you can see from the screenshots above, we first faced several issues:
- Several problems were connected with hand detection . The detector did not work stably enough. In particular, it could not properly detect a hand with only the index finger pointed , though this is a dominant configuration. Also, we faced some issues when moving the hand too far away from the camera (more than one meter) and it is quite uncomfortable to have to set up the system so close to the wall.
- Another problem was the video processing speed (framerate) - only 12 frames per second (fps) on average. It was not very surprising as the pipeline involves two deep neural networks. Unfortunately, this speed prevented us from getting smooth lines and drawing freely.
Let us see how we dealt with these issues!
Improvements
In order to increase the hand detection precision, we retrained the hand detector’s model on our own data. A small dataset of 12000 images of hands (thanks to our colleagues at Preste for their “manual” contribution!) was collected and labeled with the Computer Vision Annotation Tool (CVAT). After data splitting , it gave us 9500 images for training, 1000 images for validation and 1500 images for testing.

Also, we used various data augmentation techniques (via image preprocessing): brightness, translation, zoom in and out, rotation, shear transformation and horizontal flip with subsequent normalization. After these manipulations, we needed to feed a retrained network with normalized images for correct inference.
The loss function we used for training the network was a combination of cross-entropy loss and mean square loss . We used Adam optimizer to find the best weights for the model. Eventually, we retrained the hand detector’s network (Yolo) for 100 epochs and set 32 images per batch. You can see the code and all parameters here.
We then compared the performance of this retrained model versus the model we used for the first prototype, using three very common metrics : accuracy, precision and recall . In order to determine the correctness of detection, we used the value of IOU. If the value of IOU was more than 0.5, then we considered that the detector predicted the hand position correctly, otherwise - it did not.
The results we got are given below:
| before training | after training | |
|---|---|---|
| Accuracy | 72.68 % | 89.14 % |
| Precision | 84.80 % | 99.45 % |
| Recall | 50.78 % | 77.24 % |
Hand detector had been significantly improved .
We could then use this upgraded version to improve further our AI whiteboard.
Performance Optimizations
Although Jetson Xavier NX has a fairly powerful graphics processor unit, it still could not reach real-time video processing for our neural network pipeline.
Luckily enough, NVIDIA offers a library to make the best out of their GPU-based hardware: TensorRT library [2] allows us to increase inference performance. Installation instructions are available here (usually installed with JetPack when configuring the Jetson device).
In order to use the library, we converted our models (hand and fingertips detectors) to TensorRT engines . To do this, we followed the next 3 steps:
- Freezing graph and removing training nodes (.h5 → .pb)
- Converting frozen graph to onnx (.pb → .onnx)
- Converting onnx model to TensorRT engine (.onnx → .engine)
We serialized TensorRT engines to the device after converting and the code loaded them every time the AI whiteboard started.
NB: Here we need to point out that TensorRT runs device-specific profiling during the optimization phase. Therefore, you will need to rebuild the engines if you want to use other hardware for inference (different from Xavier NX). The conversion script is also available in the repository. And for an even deeper understanding of TensorRT, you can use this guide.
We could then compare the solution performance with captured image shape 320x240 and after switching the Jetson device to high-performance mode. For Jetson Xavier NX, we used power mode ID 2 (15W 6 cores).
| keras model | TensorRT engine (fp32) | TensorRT engine (fp16) | |
|---|---|---|---|
| Average FPS | 12 | 33 | 60 |
As you can see, the library brought a great increase in speed (x5). Still, we needed to check the accuracy of the engines, because a lower float point precision can have some impact on the model functional performance.
Final Results
| TensorRT engine (fp32) | TensorRT engine (fp16) | |
|---|---|---|
| Accuracy | 89.14 % | 89.07 % |
| Precision | 99.45 % | 99.45 % |
| Recall | 77.24 % | 77.10 % |
Great result! We suffered only a marginal decrease in accuracy and recall, which was not significant at all for our purpose. We were good to go!
AI whiteboard: ready for use!

As you can see from the short video extract above, our whiteboard now works fine and fast! Check a full video on youtube
Feel welcome to check out our repository with all the instructions, as well as the models and TensorRT engines.
You can now paint on the walls and not worry about future repairs !