Micro-SD card on custom jetson nano

Hello,

I’m using a custom jetson-nano and I’m struggling with trying to get the micro-sd card work.

I followed this https://forums.developer.nvidia.com/t/jetson-nano-sd-card-can-use-but-kernel-prompt-error/154587 but it still not working.

I flashed the board with flash.sh (./flash.sh jetson-nano-emmc mmcblk0p1) and then I edited the dts file tegra210-p3448-0002-p3449-0000-b00.dts to set sdhci@700b0400 status as “okay” and also I added nvidia,vmmc-always-on.

Also, I activated the pins GPIO07 and GPIO09 but still not working.

1 Like

If you are new to such kernel and dts work, then you should share below information

  1. The full dmesg

  2. The full dts. Convert the dtb back to dts and share it here.

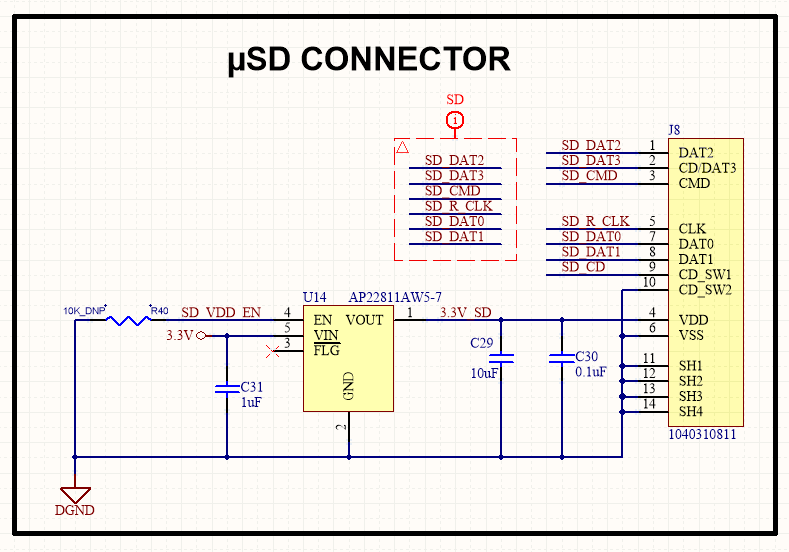
  3. Your board schematic.

Setting sdhci@700b0400 to enabled is just turning on the controller, it does not have other parameters to match your board. For example, the cd-gpios, and the power supply. If you don’t change them, then they are just same as our default setting. Which may not match your board at all.

1 Like

Thank you, here are the dmesg and the dts. I asked for the schematic and I’ll share it as soon as possible.

tegra10.dts (326.9 KB)
dmesg.txt (60.5 KB)

There is no response from sdhci@700b0400 at all. You also don’t have cd-gpios in your device tree.

I tried to add cd-gpios = <&gpio TEGRA_GPIO(Y, 2) 0>; but it gave me an error on compilation.

Honestly, when you try to give a comment. Please also tell others how you do that. For example, you should tell us how you build dtb here.

I can “guess” why you hit this error. But it is still better that you tell us how you build your dtb first.

I build the dtb with dtc -I dts -O dtb -o tegra210-p3448-0002-p3449-0000-b00.dtb tegra210-p3448-0002-p3449-0000-b00.dts

Yeah, that is the problem. DTC tool does not know what is &gpio.

Only the dts sources have the definition. You should download the kernel source and follow the document to build it.

Not always using the dtc.

https://developer.nvidia.com/embedded/linux-tegra-r325

https://docs.nvidia.com/jetson/l4t/index.html#page/Tegra%20Linux%20Driver%20Package%20Development%20Guide/kernel_custom.html#wwpID0E06C0HA

Ok, thanks. I’ll try that.

Here are the schematics.

SOM SD pins:
SOM_SD_pins

SOM GPIO for micro-SD:

TVS protection:


R37 is not placed (internal pull-up expected). R36 protects the SOM in case GPIO07 is configured as output for other purposes and the card is inserted, shouldn’t disturb card detect functionality with a strong internal pull-up.

Micro-SD card socket + load switch:

Hi,

Please add cd-gpios back first.

Hi,

I followed the steps and flashed the board again. I set the initial configurations (language, user, password,…) but then the board is not working. It’s connected to a monitor and when it’s booting three errors appear, ‘Failed to start Load Kernel Modules’, ‘Failed to start nvpmodel service’, and ‘Failed to start Configure USB flashing port for device mode…’


It is time to learn how to use the uart console to debug but not the monitor.

https://elinux.org/Jetson/General_debug

1 Like

At the end I’m not able to enter the login.

debug.txt (18.7 KB)

Why? The password and account are wrong?

1 Like

I’m not sure, I’m trying to type the password but it doesn’t type anything.

You probably don’t connect the UART pin correctly…

I built the kernel again and I flashed the board, now it’s working. I guess now I have to modify the dts file to activate the pins for the micro-sd card?

Hello,

I found this doc https://docs.nvidia.com/jetson/l4t/index.html#page/Tegra%20Linux%20Driver%20Package%20Development%20Guide/adaptation_and_bringup_nano.html#wwpID0E0EQ0HA where it says that I have to customize a pinmux spreadsheet, but I need the pins CD and VDD_EN and there are not on that spreadsheet.

So, where exactly do I have to change those two pins? If I can’t compile the dts file with the DTS tool, how do I compile it?

Thanks.

I am not sure why you asked the same question again. The answer is already provided in the previous comment.

The purpose of pinmux is just change the functions of some pins. That is, we do have some pins that can be either gpio or SFIO. If such pin setting is already GPIO as you need, then you don’t need to modify it from pinmux spreadsheet again.

1 Like