Problem with connecting the SPI to the Jetson Nano

Hi, I’m having a problem using SPI on a Jetson Nano, can anyone who has experienced this help me?

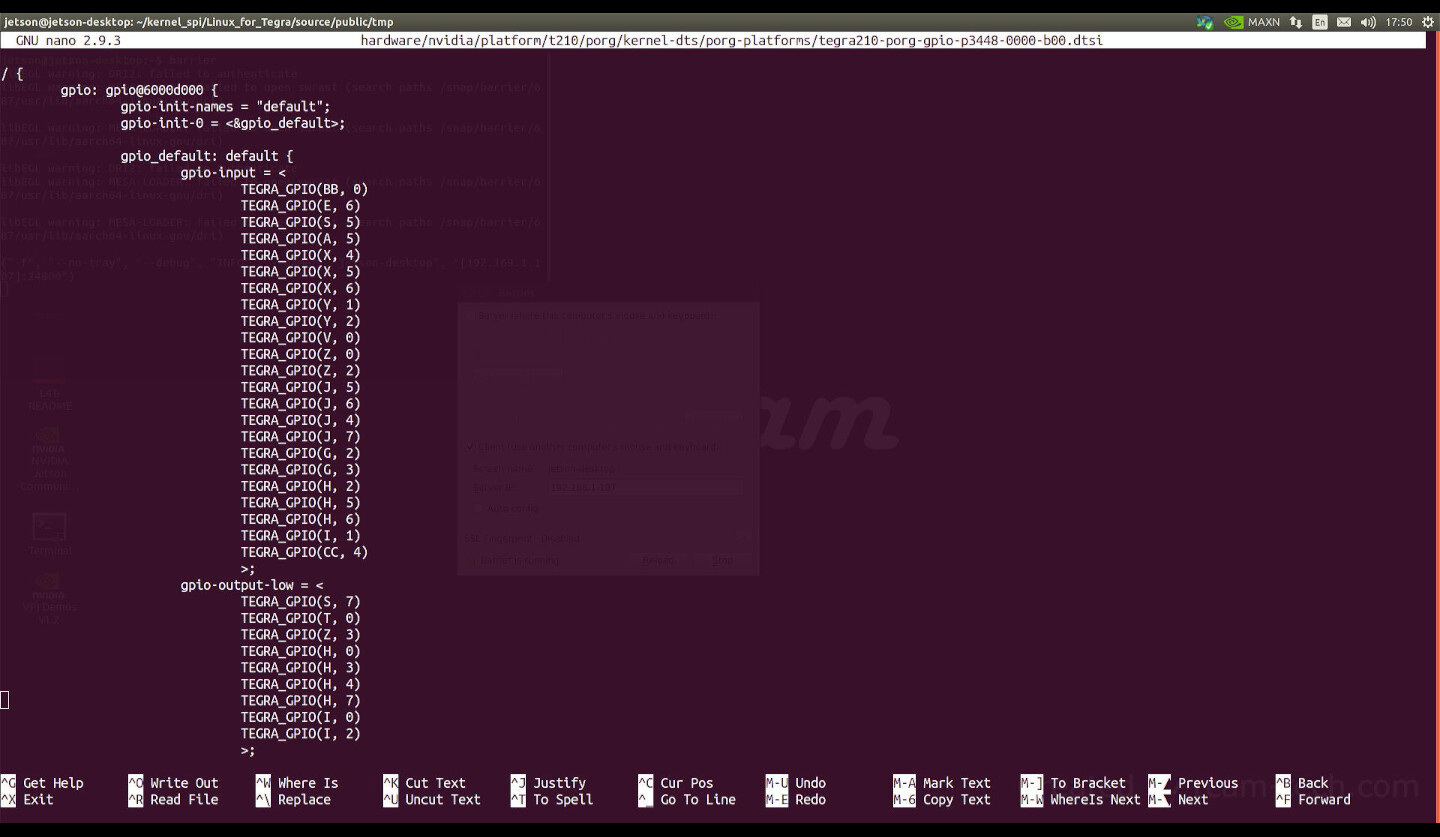
I enabled the use of SPI1 via jetson-io.

Replaced in nvidia, function rsvd1 with spi1, for all spi1__**

Loaded spidev via sudo modprobe spidev bufsiz=65563

Tested with sudo ./spidev_test -D /dev/spidev0.0 -g16 -zz (pins 19 and 21 connected in a loop)*
using device: /dev/spidev0.0
setting spi mode for read, write
setting spi bpw
setting max speed for rd/wr
spi mode: 0
bits per word: 8 bytes per word: 1
max speed: 10000000 Hz (10000 KHz)
no. runs: 1
Using seed: 0x645a676b
loop count = 0
using sequential pattern ....
transfer bytes [16]
0000: 00 01 02 03 04 05 06 07 08 09 0A 0B 0C 0D 0E 0F
transfer: Return actual transfer length: 16
receive bytes [16]
0000: 00 00 00 00 00 00 00 00 00 00 00 00 00 00 00 00
mismatch index 1
^^^ 00 00 00 00 00 00 00 00 00 00 00 /dev/spidev0.0: TEST FAILED !!!!! (status:-1)

Checked dmesg | grep -i kernel

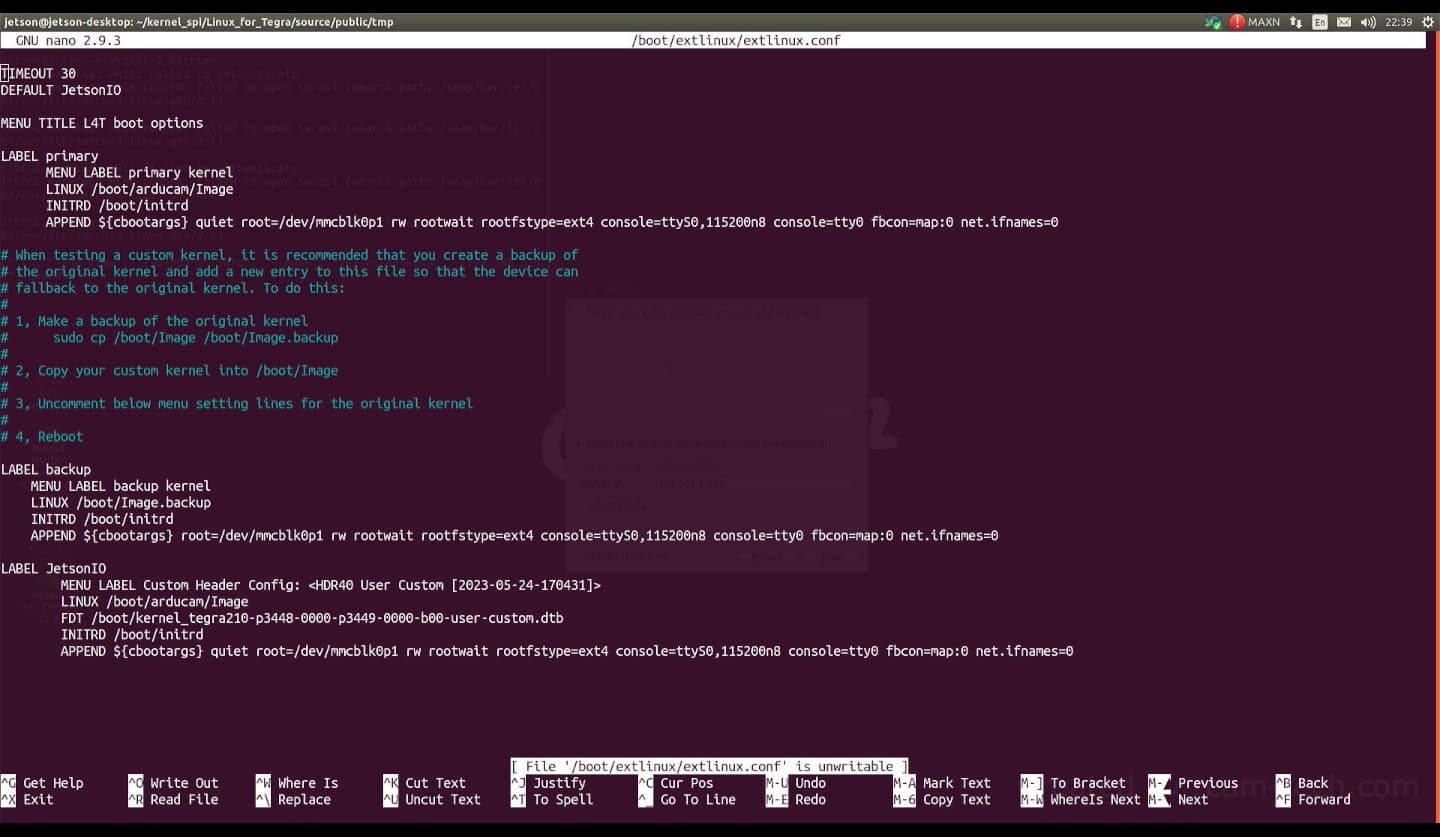
Checked sudo cat /boot/extlinux/extlinux.conf
TIMEOUT 30
DEFAULT JetsonIO

MENU TITLE L4T boot options

LABEL primary
MENU LABEL primary kernel
LINUX /boot/arducam/Image
INITRD /boot/initrd
APPEND ${cbootargs} quiet root=/dev/mmcblk0p1 rw rootwait rootfstype=ext4 console=ttyS0,115200n8 console=tty0 fbcon=map:0 net.ifnames=0

# When testing a custom kernel, it is recommended that you create a backup of
# the original kernel and add a new entry to this file so that the device can
# fallback to the original kernel. To do this:
#
# 1, Make a backup of the original kernel
# sudo cp /boot/Image /boot/Image.backup
#
# 2, Copy your custom kernel into /boot/Image
#
# 3, Uncomment below menu setting lines for the original kernel
#
#4, Reboot
# LABEL backup
# MENU LABEL backup kernel
# LINUX /boot/Image.backup
# INITRD /boot/initrd
# APPEND ${cbootargs}

LABEL JetsonIO
MENU LABEL Custom Header Config: <HDR40 User Custom [2023-05-08-002158]>
LINUX /boot/arducam/Image
FDT /boot/kernel_tegra210-p3448-0000-p3449-0000-b00-user-custom.dtb
INITRD /boot/initrd
APPEND ${cbootargs} quiet root=/dev/mmcblk0p1 rw rootwait rootfstype=ext4 console=ttyS0,115200n8 console=tty0 fbcon=map:0 net.ifnames=0

Here is the result of running cat /etc/nv_tegra_release
# R32 (release), REVISION: 7.3, GCID: 31982016, BOARD: t210ref, EABI: aarch64, DATE: Tue Nov 22 17:30:08 UTC 2022

Also checked sudo cat /sys/kernel/debug/tegra_gpio and it seems to be a problem with this, because the result does not match the examples in similar threads on the forum, but I can’t figure out how to fix it

Hi illyaverb,

Are you using the devkit or custom board for Jetson Nano?

It seems you’ve done some setups for SPI1.

Could you help to refer to the following thread to do loopback test step-by-step?
Jetson Nano SPI Bus Not Working - #10 by KevinFFF

Hi, I apologize for the delayed response. I attempted to perform a new kernel build; however, the error persists. Perhaps you could assist me in identifying where I made the mistake?

I assembled the kernel according to the instructions (Kernel Customization — Jetson Linux Developer Guide documentation sources) and solutions in this topic (How to install custom kernel with Jetpack 4.4 - #12 by manthey).

Also, here I added an option to backup the kernel image, so as not to break the system due to a custom kernel.

Hi again, could you please help me with what you suggested as it did not fix the SPI loopback test failure?

Hi, here is what I’ve done additionally.

  1. I set the correct kernel image folder in extlinux.conf.
  2. Since the Jetson-IO application crashed after opening, I added pinmux manually:
exp-header-pinmux {
    phandle = <0x131>;
    linux,phandle = <0x131>;

    hdr40-pin26 {
            nvidia,enable-input = <0x1>;
            nvidia,tristate = <0x0>;
            nvidia,pull = <0x2>;
            nvidia,function = "spi1";
            nvidia,pins = "spi1_cs1_pc4";
    };
    hdr40-pin24 {
            nvidia,enable-input = <0x1>;
            nvidia,tristate = <0x0>;
            nvidia,pull = <0x2>;
            nvidia,function = "spi1";
            nvidia,pins = "spi1_cs0_pc3";
    };
    hdr40-pin23 {
            nvidia,enable-input = <0x1>;
            nvidia,tristate = <0x0>;
            nvidia,pull = <0x1>;
            nvidia,function = "spi1";
            nvidia,pins = "spi1_sck_pc2";
    };
    hdr40-pin21 {
            nvidia,enable-input = <0x1>;
            nvidia,tristate = <0x0>;
            nvidia,pull = <0x1>;
            nvidia,function = "spi1";
            nvidia,pins = "spi1_miso_pc1";
    };
    hdr40-pin19 {
            nvidia,enable-input = <0x1>;
            nvidia,tristate = <0x0>;
            nvidia,pull = <0x1>;
            nvidia,function = "spi1";
            nvidia,pins = "spi1_mosi_pc0";
    };
};
  1. The SPI test failed, and the GPIO check (sudo cat /sys/kernel/debug/tegra_gpio) also failed. Here’s the output of the GPIO check:
Name:Bank:Port CNF OE OUT IN INT_STA INT_ENB INT_LVL
 A: 0:0 64 40 40 24 00 00 000000
 B: 0:1 f0 00 00 00 00 00 000000
 C: 0:2 1f 00 00 1b 00 00 000000
 D: 0:3 00 00 00 00 00 00 000000
 E: 1:0 40 00 00 00 00 00 000000
 F: 1:1 00 00 00 00 00 00 000000
 G: 1:2 0c 00 00 00 00 00 000000
 H: 1:3 fd 99 00 60 00 00 000000
 I: 2:0 07 07 03 02 00 00 000000
 J: 2:1 f0 00 00 00 00 00 000000
 K: 2:2 00 00 00 00 00 00 000000
 L: 2:3 00 00 00 00 00 00 000000
 M: 3:0 00 00 00 00 00 00 000000
 N: 3:1 00 00 00 00 00 00 000000
 O: 3:2 00 00 00 00 00 00 000000
 P: 3:3 00 00 00 00 00 00 000000
 Q: 4:0 00 00 00 00 00 00 000000
 R: 4:1 00 00 00 00 00 00 000000
 S: 4:2 a0 80 00 00 00 00 000000
 T: 4:3 01 01 00 00 00 00 000000
 U: 5:0 00 00 00 00 00 00 000000
 V: 5:1 01 00 00 00 00 00 000000
 W: 5:2 00 00 00 00 00 00 000000
 X: 5:3 78 08 08 70 00 60 606000
 Y: 6:0 06 00 00 02 00 00 000000
 Z: 6:1 0f 08 08 04 00 06 020600
AA: 6:2 00 00 00 00 00 00 000000
BB: 6:3 01 00 00 00 00 00 000000
CC: 7:0 92 80 80 00 00 12 121200
DD: 7:1 01 00 00 00 00 00 000000
EE: 7:2 00 00 00 00 00 00 000000
FF: 7:3 00 00 00 00 00 00 000000
  1. The kernel image check (uname -a) shows that the new image is in use:
Linux jetson-desktop 4.9.299-tegra #1 SMP PREEMPT Wed May 24 13:13:41 EEST 2023 aarch64 aarch64 aarch64 GNU/Linux
  1. I checked the DTB result with dtc -I fs /proc/device-tree -O dts -o extracted_proc.dts, and it shows the same as what I set.

  2. Here is the updated content of extlinux.conf:

TIMEOUT 30
DEFAULT JetsonIO

MENU TITLE L4T boot options

LABEL primary
      MENU LABEL primary kernel
      LINUX /boot/arducam/Image
      INITRD /boot/initrd
      APPEND ${cbootargs} quiet root=/dev/mmcblk0p1 rw rootwait rootfstype=ext4 console=ttyS0,115200n8 console=tty0 fbcon=map:0 net.ifnames=0

# When testing a custom kernel, it is recommended that you create a backup of
# the original kernel and add a new entry to this file so that the device can
# fallback to the original kernel. To do this:
#
# 1, Make a backup of the original kernel
#      sudo cp /boot/Image /boot/Image.backup
#
# 2, Copy your custom kernel into /boot/Image
#
# 3, Uncomment below menu setting lines for the original kernel
#
# 4, Reboot

LABEL backup
    MENU LABEL backup kernel
    LINUX /boot/arducam/Image.backup
    FDT /boot/kernel_tegra210-p3448-0000-p3449-0000-b00-user-custom.dtb
    INITRD /boot/initrd
    APPEND ${cbootargs} root=/dev/mmcblk0p1 rw rootwait rootfstype=ext4 console=ttyS0,115200n8 console=tty0 fbcon=map:0 net.ifnames=0

LABEL JetsonIO
        MENU LABEL Custom Header Config: <HDR40 User Custom [2023-05-24-170431]>
        LINUX /boot/arducam/Image
        FDT /boot/dtb/tegra210-p3448-0000-p3449-0000-b00-custom-kernel.dtb
        INITRD /boot/initrd
        APPEND ${cbootargs} quiet root=/dev/mmcblk0p1 rw rootwait rootfstype=ext4 console=ttyS0,115200n8 console=tty0 fbcon=map:0 net.ifnames=0

I don’t know what else I can do to fix this. Help please.

@KevinFFF Sorry for bothering you, but I followed the steps you mentioned (except that I had to manually install the pinmux due to Jetson-IO utility crashing). However, the loopback test still doesn’t work. Could you please help? I also realized that I didn’t answer your question regarding the board type. I’m using a dev kit.

What is “custom” kernel meaning?
Are you using custom board or you just modify something but you are using the devkit?

If you are using the devkit, you should be able to use Jetson-IO to configure pinmux. I think that would be a easier way for you to configure pinmux instead of generating from spreadsheet or modify in dtsi file.

Is there any error messages while crashing?
Please run the following command on your board.

$sudo /opt/nvidia/jetson-io/jetson-io.py

Thank you for your reply.

I’m definitely using devkit and I’ve only modified dtb and Image.
Maybe I worded it wrong, by custom kernel I meant the kernel I put together after removing GPIO usage in that device tree as per your advice Jetson Nano SPI Bus Not Working - #10 by KevinFFF and according to the instructions here Kernel Customization — Jetson Linux Developer Guide documentation. Then copied the created Image to /boot/arducam and /boot.

I agree with you that it is easier, before that I did it that way, but after changing the path to dtb in extlinux.conf:

LABEL JetsonIO
        MENU LABEL Custom Header Config: <HDR40 User Custom [2023-05-24-170431]>
        LINUX /boot/arducam/Image
        FDT /boot/dtb/tegra210-p3448-0000-p3449-0000-b00-custom-kernel.dtb

it crashes quietly without any error message. I tried running this command again and I don’t even know how to show you that the console window flashes (for less than a second) while trying to open the utility (gray screen with a console frame), but immediately returns to the normal view.

You could just replace the Linux_for_Tegra/kernel/dtb/tegra210-p3448-0000-p3449-0000-b00.dtb with your tegra210-p3448-0000-p3449-0000-b00-custom-kernel.dtb. (i.e. just replace the dtb with the same name)
You don’t need to modify extlinux.conf.

And where is the Linux_for_Tegra folder in which you need to replace tegra210-p3448-0000-p3449-0000-b00.dtb? I understood that it is necessary to replace /boot/dtb/tegra210-p3448-0000-p3449-0000-b00.dtb, or some other in the /boot folder, but I don’t understand which one is the main one when the system boots.

Linux_for_Tegra folder is the BSP package which could be downloaded from release page or SDKM.
This is the directory on your host PC, not on your board.
Just replace the dtb and reflash the whole board to apply it.

Here are the steps I took:

  1. I downloaded and extracted the Linux_for_Tegra directory from this site (Jetson Linux R32.7.3 | NVIDIA Developer) into the ~/kernel_spi folder

  2. Then I changed the contents of the file ~/kernel_spi/Linux_for_Tegra/source/public/hardware/nvidia/platfrom/t210/porg/kernel-dts/porg-platfroms/tegra210-porg-gpio-p3448-0000-b00.dtsi according to your recommendations for disabling ports as GPIOs.

  3. Started the compilation in the folder ~/kernel_spi/Linux_for_Tegra/source/public/tmp according to steps 5-7 of the solution How to install custom kernel with Jetpack 4.4 - #12 by manthey

  4. Copy the resulting kernel image to /boot/Image and /boot/arducam/Image

  5. Changed rsvd1 to spi1 in the file ~/kernel_spi/Linux_for_Tegra/source/public/tmp/kernel/kernel-4.9/arch/arm64/boot/dts/tegra210-p3448-0000-p3449-0000-b00.dtb and copied modified file in /boot/dtb/tegra210-p3448-0000-p3449-0000-b00-custom-kernel.dtb.

  6. Manually install the pinmux in SPI state.

  7. Manually installed FDT /boot/dtb/tegra210-p3448-0000-p3449-0000-b00-custom-kernel.dtb in extlinux.conf.

After each of these steps I tested the SPI but nothing works. It is possible that I did not mention something above, because I read different topics and tried to make it work. Can you advise how in my case, given my /boot, ~/kernel_spi/Linux_for_Tegra directories to fix it, or recompile it so it finally works?

From your Step4, the generated kernel image and dtb should be updated in your BSP package(Linux_for_Tegra directory).

You could just reflash the whole board with the following command to apply the change.

$sudo ./flash.sh jetson-nano-devkit mmcblk0p1

After it boot up successfully, you could use Jetson-IO to modify the pinmux for SPI usage.

Before this I didn’t have the flash.sh file, during the previous steps I downloaded the Driver Package (BSP) Sources from the link you provided above.

Now I additionally downloaded the Driver Package (BSP) where I found this file, then copied the compiled Image into the ~/kernel_spi/Linux_for_Tegra/kernel subfolder, then ran your command and got:

jetson@jetson-desktop:~/kernel_spi/Linux_for_Tegra$ sudo ./flash.sh jetson-nano-devkit mmcblk0p1
###############################################################################
# L4T BSP Information:
# R32 , REVISION: 7.3
###############################################################################
./flash.sh: line 642: ./tegrarcm: cannot execute binary file: Exec format error
Error: probing the target board failed.
       Make sure the target board is connected through 
       USB port and is in recovery mode.

How to fix it?
Additional information, I compile the kernel image directly on the Jetson Nano DevKit.

You could refer to the following instruction for detailed steps to download BSP package and flash the devkit.
NVIDIA Jetson Linux Developer Guide : Quick Start | NVIDIA Docs

Please make your board enter into force recovery state before flash.
You could short REC and GND before power on the board to enter this state.

Could you try compiling them from a standalone Ubuntu 16.04 or 18.04 host PC?

This topic was automatically closed 14 days after the last reply. New replies are no longer allowed.