Render usable results without denoising

Hi, I’ve been playing around with the render settings for RTX - Interactive (Path Tracing) for a while, as everything that Create generated was terribly “mushy” and flickering. I realised now that this was down to the “Denoising” option. Deactivating this option gives me far nicer results:

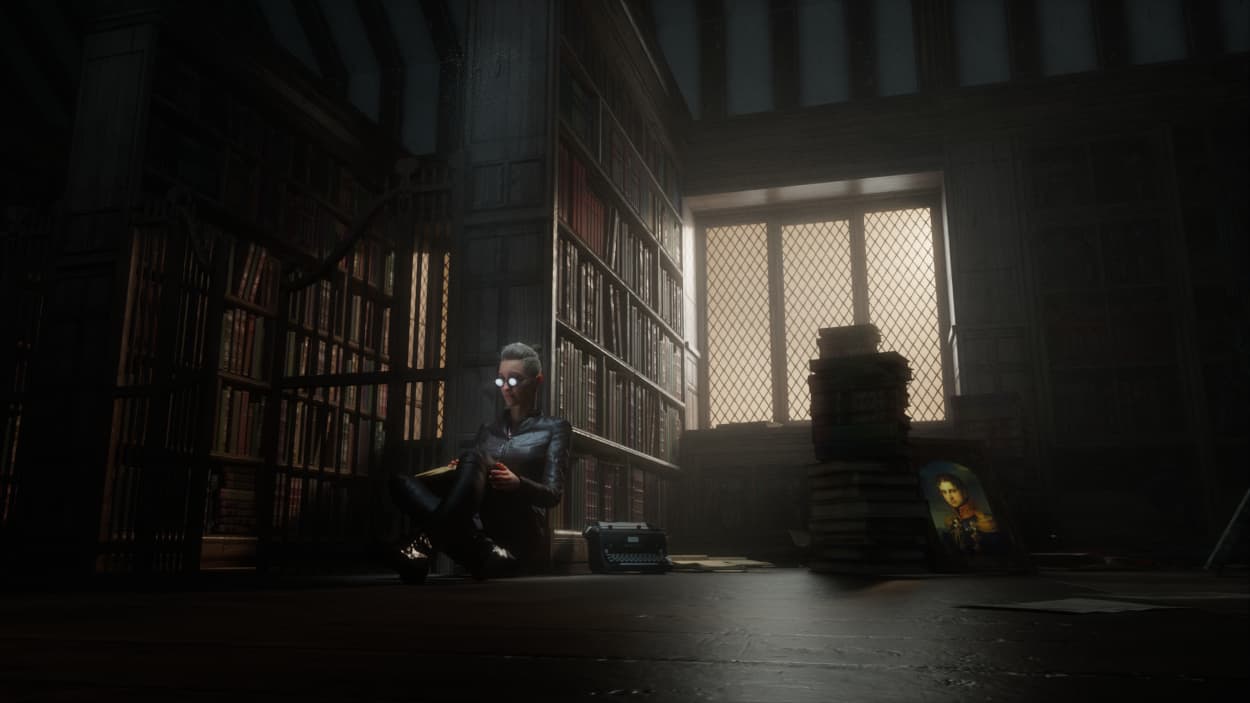
This is using 10 “Path Trace samples per pixel (per subframe)” in the “Movie Capture” panel.

However, as you can tell, there is a lot of residual noise on the floor that I can’t seem to get rid of.

I’ve got “Firefly Filtering” active, but touching the “Denoising” option means I either have to crank up the “Blend Factor” too high - meaning I’ll get the same mushy results as before - or if I don’t do it, I end up with noise.

I’ve tried all of the settings it seems, but nothing seems to rectify this issue. Is there anything I’m missing? I really hope that the answer isn’t cranking up the “Path Trace samples per pixel (per subframe)” option, as this is already pretty slow at 10.

Octane Render has an option that allows “clamping” the GI, which gets rid of the same type of noise I’m seeing here. Is there an option to do the same in Create?

Thanks for letting me know :-)

I think I have a trick: How to gradually make meshes disappear? - #14 by user79641

Hi, thanks for the suggestion. I had a look at the other thread and went over my project again.

From my tests, the best way to get “clean” results, is to leave “Samples per pixel per iteration” at “1” and crank “Path Trace samples per pixel (per subframe)” up to “64”.

If I set “Samples per pixel per iteration” to the same number as “Path Trace samples per pixel” (e.g. 32 & 32) the video renders a lot faster, but the noise remains the same, no matter how much I increase these numbers.

Setting it to 1 & 64 as shown above takes quite a lot of rendering, but the results are rather noise free, as you can see here.

Would be great, if there was a way to tweak the settings so I could get a clean result without having to go this high. 7 minutes rendering for 2 seconds of animation is bit much. Redshift would render this in less than half the time and that’s a dedicated offline renderer vs. NVIDIA’s RTX - “Interactive” (Path Tracing). Really strange.

For the time being, I guess I should be happy enough that the weird ‘Denoiser mush’ is gone, but I’d really like to find out how to improve this.

1 Like

OK, I continued my test a little more and I think I have now found a usable balance between the number of samples, the denoiser and render times.

My settings are as follows:

In the “Render Settings” window under “Path Tracing” activate “Denoising” and leave the “OptiX Denoiser Blend Factor” at “0”.

Then go into the “Movie Capture” window and set “Samples per pixel per iteration” to “32” and Path Trace samples per pixel (per subframe)" to “64”.

Also make sure to “Enable motion blur” and under the “Path Trace Motion Blur Settings” set the “Subframes per frame” to at least “5”.

With all of this set, I get the following render at around 4 seconds per frame (that’s with 3x RTX 2080 Super cards):

Looks good enough to me. The annoying noise is gone, while the mushy artefacts that the Denoiser tends to generate are also absent. It’s a win-win.

A couple of additional findings:

  • Setting the “Samples per pixel per iteration” to the same number as the “Path Trace samples per pixel” reintroduces Denoiser artefacts. Having the “Samples per pixel per iteration” at half the number of the “Path Trace samples per pixel” (e.g. 32 / 64) seems to be the sweet spot, but more tests would be necessary.
  • Enabling motion blur and giving a healthy amount of “Subframes per frame” really helps in hiding the noise and artefacts. When I reduced the number of “Subframes per frame” the noise started to creep back in, so - even though render time gets reduced by decreasing the number of “Subframes” - it usually doesn’t seem like a good idea to skimp here.

That’s it so far. I’m glad that I’m finally able to have RTX - Interactive (Path Tracing) generate usable renders and I hope this will help anybody else, who is running into the same issue. Fingers crossed that NVIDIA will follow up with better documentation and more tutorial videos on this issue.

2 Likes

And just to prove that there is no Denoiser flickering, here’s the same animation but slower, using the same settings as above:

1 Like

Hi @Ferdinand13 !

Thank you so much for your tests and your feedback !

I tried to clearly understand what the different sampling parameters are for, between those located in the Render Settings menu and those found in the Movie Capture menu (I still haven’t understood if the parameters set in the Render Settings menu have an impact on rendering, or if it is only valid for rendering in the viewport and it is the Movie Capture settings that impact output renderings).

It’s really cool that someone with access to computing power did some testing !
I wanted to do a lot of renderings in Path Trace, but I had this noise effect and this feeling of “fuzziness” in the textures…

These parameters that you shared with us seem to solve this problem, is it the case ?

Hi Billy,

You’re welcome :-) And yes, at least in my case the fuzziness has disappeared using these settings. Having used offline renderers such as Octane Render, Redshift and Cycles I was already aware of what bad denoising looks like, which is mostly a result of not enough samples to begin with. So the solution to the fuzziness and the artefacts is - as was before - throwing more samples at the problem and this unfortunately always means longer render times.

In my case, using the 16/64 or 32/64 ratio for the “Samples per pixel per iteration”/“Path Trace samples per pixel” settings works, but depending on your scene you might be able to decrease this ration (maybe 16/32) or you might have to crank things up even more (like 64/128).

To quickly answer your question about the relationship between the Render Settings and the Movie Capture panel, the functionality - as far as I can see - is as follows:

  • I haven’t looked into the Anti-Aliasing option yet, but I’m pretty sure this controls Anti-Aliasing behaviour for both the viewport and Movie Capture exports.
  • Firefly Filtering controls it for both the viewport and Movie Capture exports. Playing around with the sliders didn’t cause any changes in my test scene, but you definitely want to have this switched on to avoid the most egregious firefly noise.
  • The Path Tracing options will have an effect on viewport and Movie Capture, as long as they are related to bounces, as this sets up how photoreal the final render will be in terms of diffuse, specular, transmissive and volumetric lighting. However the two ‘Samples’ options at the bottom most likely don’t have any effect on rendering via Movie Capture (which I think we both learned the hard way :-D)
  • Sampling & Caching - I really don’t know what they do and the documentation is quite hazy on this as well.
  • The Denoising and Blend Factor slider controls affect denoising in the viewport as well as Movie Capture exports and the settings seem to have an equivalent effect in both cases.
  • I don’t have much understanding yet of the Non-uniform Volumes or Multi-GPU settings, but from the looks of it they would affect both viewport and Movie Capture rendering.
  • Finally, the AOV settings affect both as well, however, I haven’t had too much luck with AOVs from Create in the past as they’ve been a bit buggy (and Create doesn’t seem to be able to roll all AOV passes into one EXR file, meaning you end up with a swamp of image files for your animation).

I hope this helps and that you stick with Create despite all its quirks, because I can really feel a good piece of software hiding in there. They just need to spend more time finessing it :-)

1 Like

I made some tries myself and I came to…unexpected results !

I made a render on a logo animation, with a carbon material, with no background (except for the DomeLight, that brings light, but isn’t printed in the output render).

I tried to render with samples 32/64, Motion Blur disabled, but something weird happened :


It seems that the renderer prints a combination between 2 frames, resulting in a kind of “ghosted” frame.

But if I push the samples to 64/64 (still no Motion Blur), this weird effect disappears :


But the texture seems noisy, and a bit blurry, so I decided to test something drastically higher, like 512/512 (still no Motion Blur), and there was absolutely no differences :

To clearly see the similarities, get focused on the top left shape (it’s the underside of a letter “A”), you’ll notice that, even if the samples are 8 time higher, there is no improvements.

I even tried with something totally crazy, 4096/4096 but, once again, no differences, no improvements…

In your mind, what could make a difference ?

Hey, thanks for sharing. About the weird ghost frame, yes that’s most likely down to there not being enough subframes per frame. When you’ve got Motion Blur activated and hit render, you can see in the little window that appears that Create is essentially re-rendering each image a couple of times. It then blends them together to get the smooth Motion Blur. Deactivating Motion Blur does indeed cause ghosting/strobing issues - I came across them as well in my test.

Regarding your settings (and the still persistent noise), I think the trick is to not use the same amount of samples for “Samples per pixel per iteration” and “Path Trace samples per pixel” as they seem to cancel each other out.

Increasing “Path Trace samples per pixel” increases the quality of the render, meaning the render takes longer.

“Samples per pixel per iteration” on the other hand seems to reduce render times by making the renderer less picky when it comes to noise.

So to sum up, with “Samples per pixel per iteration” set to “1” and “Path Trace samples per pixel” set to “64” you should get a pretty high quality noise free result (that is if you have Denoising activated), but it’s gonna render for a looong time.

What you can then do is try to increase the “Samples per pixel per iteration” from “1” to “8”, then to “16” and then to “32”, to see at which point the noise/artefacts that come creeping in become a dealbreaker. Then you pick the next one down, knowing that you’re using the best looking settings that render as fast as possible.

Hope this helps.

1 Like

Actually, that looks like a quite good plan to effectively define the best rendering settings !

I’m gonna give it a try !

On my renders, I disable Motion Blur because I need some stereoscopic renders, I don’t need them to be degraded by the Motion Blur effect and, if I really need it afterward, I add it in After Effects…

Yes, that’s how you should deal with every renderer, because it will always let you render at the least taxing settings for the best looking result.

BTW, the same goes for the Path-Tracing controls in the Render Settings window. You should crank everything from “Max Bounces” to “Max Non-uniform Volume Scattering Bounces” down to “1” and then check in the viewport, at which point the image starts looking like you want. Then don’t go any higher than that.

The best example is that for simple scenes and most outdoor scenes, 3 bounces are enough, but Create for instance defaults to “4” for “Max Bounces”, which means you’re wasting performance on a lot of occasions.

Good plan on adding the Motion Blur later in After Effects. I’ve had hits and misses that way. Sometimes it really works out, others I ended up with some ugly artefacts caused by the Pixelmotion Blur effect in AE. But there’s really no ‘absolute truth’ to be had in this business. On some occasions things work, on others they don’t. If you can fake it in AE after the fact, that would definitely be the better option :-)

This is very cool info! Thanks!
I have also played with these a lot, and sometimes the settings I have found must be tweaked when moving to rendering farm, since that “Samples per pixel per iteration” can be raised very high in multi GPU machines.

I do testings again, following the tips here!

@Ferdinand13
Hi,
Out of curiosity, what were your original render times for comparison?

Hi, my original render times per frame were closer to 20-30sec at which point we’re in Redshift territory, which is a lot more predictable as a renderer, so would’ve killed the point of using Create. But with the settings mentioned above, at around 4sec a frame, I’m happy. Having said that, I have yet to throw a really complex scene at RTX - Path Tracing, to see how it copes then. Fingers crossed!

1 Like

@Ferdinand13 Do you want to test my cc4 & library scene?
I have made my best to tweak the render settings, but I guess you could find something more to squeeze out every second…

Thanks pekka.varis, I’d like to. I won’t be near my computer for a week, but why don’t you send me a link anyway and I’ll check out your scene when I’m back? I take it this is all already in USD, so easy to import the whole thing into Omniverse Create?

1 Like

Thank you very much for this!
Unfortunately, I have a dead line coming soon so I cannot wait for a week, but lets continue this optimization quest after I have done & rendered this Natasha in Sci-fi Lib project.

I am sure you can help me to find better settings!

This topic was automatically closed 14 days after the last reply. New replies are no longer allowed.