Hi
Yes I flashed a new OS and followed the instructions, and it works.
There is no need to change Pinmux spreadsheet or device tree…
only the following steps according to the Jetson Linux Develper Guide will be OK:
https://docs.nvidia.com/jetson/archives/l4t-archived/l4t-3251/index.html#page/Tegra%20Linux%20Driver%20Package%20Development%20Guide/hw_setup_jetson_can.html#
1- sudo modprobe can
2- sudo modprobe can_raw
3- sudo modprobe mttcan
4- sudo ip link set can0 up type can bitrate 500000 loopback on
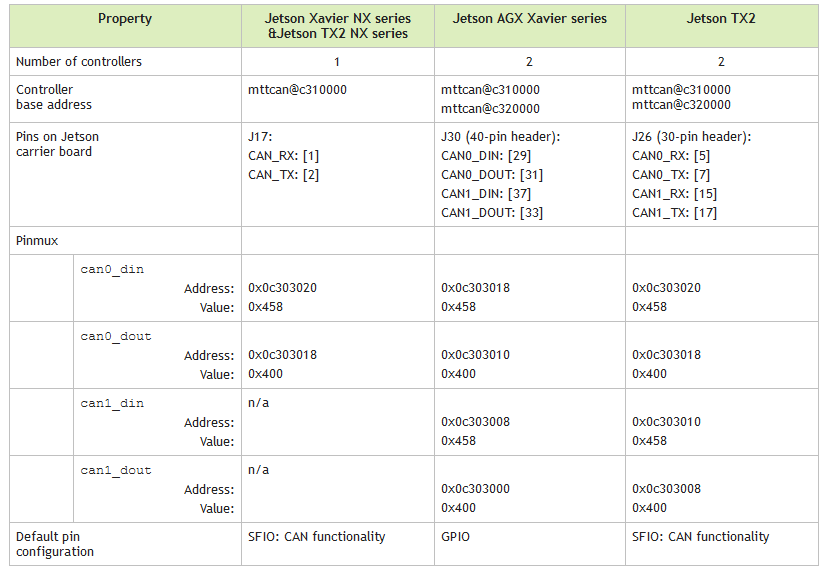
5- connect RX pin to TX pin (Pin 5 and 7 of J26)
6- candump can0
7- in another command window: cansend can0 123#AABBCCDDAABBCCDD
And you will be able to see the transmitted data below the candump.
An important point, which I found others like me make the same mistake:
If you do not connect TX to RX, the CAN controller sends the first message via TX pin and do not receive the same bytes via its RX pin. This makes the CAN controller to think that there is a fault on the bus, probably a CAN_ERROR occures, and after that, the CAN controller will not send any message on the bus until the error is deleted.
So, you will not be able to see anything even on the oscilloscope, if you did not connect TX to RX.
In a standard CAN bus, there is a CAN transceiver (which is not present on DevKit). The CAN transceiver is designed such that it reflects to the CAN RX pin any data present on the bus, no matter the bit was sent by the same node or by another node.
Another point is if you connect RX to TX pin, and do no turn loopback on, the CAN controller sends the message over and over, because there is not any other node on the bus which makes the ACK bit dominant. The transmitter node sends the message repeatedly until it is acknowledged by another node. The loopback test virtually acknowledges the CAN message.
Hope this will be useful.
Thank you ShaneCCC and kayccc for the support.