Hi all,
I have a Jetson Xavier NX here, which needs to interact with some sensors, some of which are using the SPI port 1 and some the ic2 1 interface (strangely labeled i2c 2 in jetson-io, pins 27 and 28).
I know that my wiring is fine because both work perfectly fine independently, but when I enable SPI using jetson-io, I seem to lose communication with my sensors on i2c (sudo i2cdetect -y -r 1 becomes very slow and shows no device + my scripts calling the devices for data fail).
If I use jetson-io to re-configure the GPIOs to be compatible with “Adafruit SPH0645LM4H” and reboot, I get i2c but I lose SPI.
This is a problem that I got after hardening the OS. Since this is for an application where software security is important, the OS was hardened following the CIS-CAT benchmark for Ubuntu Servers level 1. Before that hardening it was working fine but since then the issue appeared and I can’t seem to figure out what could cause the problem. This issue is identical on two different Xavier NX dev kits, using the same hardened OS.
Can someone help?
I check the i2cdetect command the scanned speed didn’t change after enable the SPI 1 by jetson-io,
However I didn’t connect any i2c device on the bus.
My BSP is J4.6(r32.6.1)
Thanks for your answer. I did a bit of testing and I found some strange results.
I connected my i2c device on pins 3 and 5 and I can now access the data of both my SPI device and the i2c one.
In my Python script, I was using the board and busio libraries like so:
and I now had to change it to: i2c = busio.I2C(board.SCL, board.SDA, frequency=50000)
The device is now found on the bus 0, whereas I used to have it on the bus 1.
Side question: why are the buses called i2c2 and i2c9 in my jetson-io interface?
Follow-up of my problem: I cannot use the pins 3 and 5 in my application as there is physically no space there to connect anything, so I am stuck with pins 27 and 28 for this i2c device.
I have stopped the Xavier NX, connected the device again on pins 27 and 28 (while keeping SPI1 enabled), and I now cannot use the i2c anymore (back to original situation). I have checked the i2c devices with i2cdetect -y -r 1 and interestingly enough, i2cdetect -y -r 1 fails like before but now i2cdetect -y -r 0 detect my device! Like if it was on bus 0 instead of bus 1. Weird?
Also, using print(i2c.scan()) in a python script now find nothing (it outputs []).
Do you have any idea of something I could try to solve this?
Thanks!
One additional piece of information:
When I simply disable SPI1 in jetson-io instead of reconfiguring the GPIOS for Adafruit SPH0645LM4H, the i2c still doesn’t work. So in this scenario nothing works. After doing the Adafruit SPH0645LM4H reconfiguration then my i2c works (but not SPI of course as it has been disabled).
Strange…
No I haven’t. Could you provide some explanations of how I could do that?
Can I find the original file available for download somewhere? Or should I flash the original OS again and make a copy of this file?
Where is the dtb file located on the Xavier?
Hi! I’m not sure I really understand your last message.
I have flashed the “original” OS image downloaded from the Nvidia website with the intent to check if I can get both i2c and SPI to work again at the same time.
For now I have not yet enabled anything, just flashed the OS and booted the Xavier and did not touch the pins configuration.
I have found a whole bunch of dtb files in /boot.
If I want to go back to the original/vanilla pin configuration on my hardened OS, which files should I take from here to use as replacement on my hardened one?
Thanks!
To add again more information: I have now enabled SPI1 with jetson-io.py and rebooted to apply the changes.
After the reboot, my i2c device is still detected and working fine (that’s good) but the SPI still doesn’t work for some reason, despite being enabled (I checked again with jetson-io):
I get this error message when I try to read from my SPI device:
Traceback (most recent call last):
File “scripts/current2.py”, line 15, in
spi.open(bus, device)
FileNotFoundError: [Errno 2] No such file or directory
Is there something I forgot to do? (also my last message remains valid: if I get this to work again on this vanilla OS I will have to somehow carry those positive changes to my hardened OS).
Thanks!
Yes, this did the trick!
So I now have my Xavier NX Dev Kit with the original OS with both my i2c and SPI working.
Which config files or dtb files should I then copy over to my hardened OS to get the same configuration?
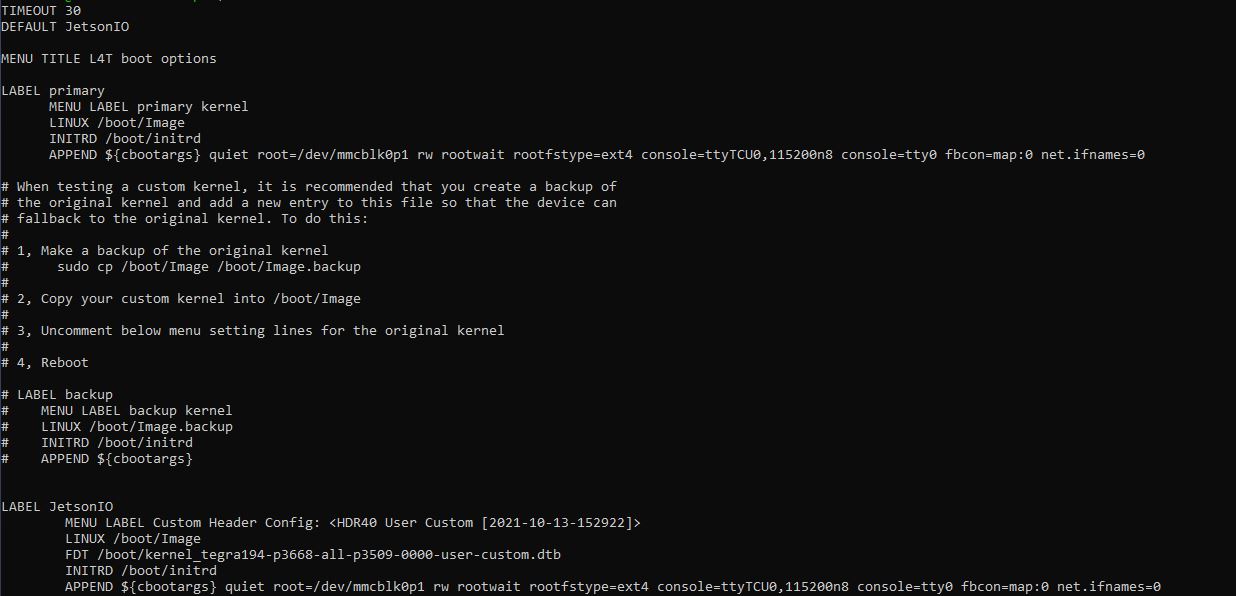
Do I understand correctly that I should copy the file /boot/kernel_tegra194-p3668-all-p3509-0000-user-custom.dtb onto my hardened OS and edit this line in the /boot/extlinux/extlinux.conf of my hardened OS to point to the file?
As explained in my very first message, I have to use a hardened Operating System for this application. This means that I used the default OS downloaded from the Nvidia website, and I then hardened it following the CIS-CAT guidelines for Ubuntu server level 1.
This involves changing permissions, removing non-used packages, setting up all kinds of security features.
So I have one SD card with my hardened OS loaded on it, which is the one that I need to get to work as it is the one I have to use in the end, and one SD card with the “default” OS. Thanks to your help it now works on the default OS (confirming that there is no hardware issue), but I need to get this to work on the hardened one.
Going back to my problem, I have now copied over the dtb file and edited the /boot/extlinux/extlinux.conf, and I have made sure that the ownership and group of the files are root, I have rebooted, and now I can read my i2c device but my SPI device gives me the No such file or directory error.
I have tried sudo modprobe spidev of course but that has no effect, I still get the error.
This what my pin configuration now looks like:
Any idea what else could cause this issue now, where I can’t access SPI despite SPI being enabled and having ran modprobe spidev?
For information, below are the configuration-related items we had to comply to:
w Benchmark Item
1 Initial Setup
1.1 Filesystem Configuration
1.1.1 Disable unused filesystems
1.0 1.1.1.1 Ensure mounting of cramfs filesystems is disabled
1.0 1.1.1.2 Ensure mounting of freevxfs filesystems is disabled
1.0 1.1.1.3 Ensure mounting of jffs2 filesystems is disabled
1.0 1.1.1.4 Ensure mounting of hfs filesystems is disabled
1.0 1.1.1.5 Ensure mounting of hfsplus filesystems is disabled
1.0 1.1.1.6 Ensure mounting of udf filesystems is disabled
1.0 1.1.2 Ensure /tmp is configured
1.0 1.1.3 Ensure nodev option set on /tmp partition
1.0 1.1.4 Ensure nosuid option set on /tmp partition
1.0 1.1.5 Ensure noexec option set on /tmp partition
1.0 1.1.6 Ensure /dev/shm is configured
1.0 1.1.7 Ensure nodev option set on /dev/shm partition
1.0 1.1.8 Ensure nosuid option set on /dev/shm partition
1.0 1.1.9 Ensure noexec option set on /dev/shm partition
1.0 1.1.12 Ensure /var/tmp partition includes the nodev option
1.0 1.1.13 Ensure /var/tmp partition includes the nosuid option
1.0 1.1.14 Ensure /var/tmp partition includes the noexec option
1.0 1.1.18 Ensure /home partition includes the nodev option
1.1.19 Ensure nodev option set on removable media partitions
1.1.20 Ensure nosuid option set on removable media partitions
1.1.21 Ensure noexec option set on removable media partitions
1.0 1.1.22 Ensure sticky bit is set on all world-writable directories
1.0 1.1.23 Disable Automounting
1.0 1.1.24 Disable USB Storage
1.2 Configure Software Updates
1.2.1 Ensure package manager repositories are configured
1.2.2 Ensure GPG keys are configured
1.3 Filesystem Integrity Checking
1.0 1.3.1 Ensure AIDE is installed
1.0 1.3.2 Ensure filesystem integrity is regularly checked
1.4 Secure Boot Settings
1.0 1.4.1 Ensure permissions on bootloader config are not overridden
1.0 1.4.2 Ensure bootloader password is set
1.0 1.4.3 Ensure permissions on bootloader config are configured
1.0 1.4.4 Ensure authentication required for single user mode
1.5 Additional Process Hardening
1.5.1 Ensure XD/NX support is enabled
1.0 1.5.2 Ensure address space layout randomization (ASLR) is enabled
1.0 1.5.3 Ensure prelink is disabled
1.0 1.5.4 Ensure core dumps are restricted
1.6 Mandatory Access Control
1.6.1 Configure AppArmor
1.0 1.6.1.1 Ensure AppArmor is installed
1.0 1.6.1.2 Ensure AppArmor is enabled in the bootloader configuration
1.0 1.6.1.3 Ensure all AppArmor Profiles are in enforce or complain mode
1.7 Command Line Warning Banners
1.0 1.7.1 Ensure message of the day is configured properly
1.0 1.7.2 Ensure permissions on /etc/issue.net are configured
1.0 1.7.3 Ensure permissions on /etc/issue are configured
1.0 1.7.4 Ensure permissions on /etc/motd are configured
1.0 1.7.5 Ensure remote login warning banner is configured properly
1.0 1.7.6 Ensure local login warning banner is configured properly
1.8 GNOME Display Manager
1.0 1.8.2 Ensure GDM login banner is configured
1.0 1.8.3 Ensure disable-user-list is enabled
1.0 1.8.4 Ensure XDCMP is not enabled
1.9 Ensure updates, patches, and additional security software are installed
2 Services
2.1 Special Purpose Services
2.1.1 Time Synchronization
1.0 2.1.1.1 Ensure time synchronization is in use
2.1.1.2 Ensure systemd-timesyncd is configured
1.0 2.1.1.3 Ensure chrony is configured
1.0 2.1.1.4 Ensure ntp is configured
1.0 2.1.2 Ensure X Window System is not installed
1.0 2.1.3 Ensure Avahi Server is not installed
1.0 2.1.4 Ensure CUPS is not installed
1.0 2.1.5 Ensure DHCP Server is not installed
1.0 2.1.6 Ensure LDAP server is not installed
1.0 2.1.7 Ensure NFS is not installed
1.0 2.1.8 Ensure DNS Server is not installed
1.0 2.1.9 Ensure FTP Server is not installed
1.0 2.1.10 Ensure HTTP server is not installed
1.0 2.1.11 Ensure IMAP and POP3 server are not installed
1.0 2.1.12 Ensure Samba is not installed
1.0 2.1.13 Ensure HTTP Proxy Server is not installed
1.0 2.1.14 Ensure SNMP Server is not installed
1.0 2.1.15 Ensure mail transfer agent is configured for local-only mode
1.0 2.1.16 Ensure rsync service is not installed
1.0 2.1.17 Ensure NIS Server is not installed
2.2 Service Clients
1.0 2.2.1 Ensure NIS Client is not installed
1.0 2.2.2 Ensure rsh client is not installed
1.0 2.2.3 Ensure talk client is not installed
1.0 2.2.4 Ensure telnet client is not installed
1.0 2.2.5 Ensure LDAP client is not installed
1.0 2.2.6 Ensure RPC is not installed
2.3 Ensure nonessential services are removed or masked Manual
3 Network Configuration
3.1 Disable unused network protocols and devices
1.0 3.1.2 Ensure wireless interfaces are disabled
3.2 Network Parameters (Host Only)
1.0 3.2.1 Ensure packet redirect sending is disabled
1.0 3.2.2 Ensure IP forwarding is disabled Fail
3.3 Network Parameters (Host and Router)
1.0 3.3.1 Ensure source routed packets are not accepted
1.0 3.3.2 Ensure ICMP redirects are not accepted
1.0 3.3.3 Ensure secure ICMP redirects are not accepted
1.0 3.3.4 Ensure suspicious packets are logged
1.0 3.3.5 Ensure broadcast ICMP requests are ignored
1.0 3.3.6 Ensure bogus ICMP responses are ignored
1.0 3.3.7 Ensure Reverse Path Filtering is enabled
1.0 3.3.8 Ensure TCP SYN Cookies is enabled
1.0 3.3.9 Ensure IPv6 router advertisements are not accepted
3.4 Uncommon Network Protocols
3.5 Firewall Configuration
3.5.1 Configure UncomplicatedFirewall
1.0 3.5.1.1 Ensure ufw is installed
1.0 3.5.1.2 Ensure iptables-persistent is not installed with ufw
1.0 3.5.1.3 Ensure ufw service is enabled
1.0 3.5.1.4 Ensure ufw loopback traffic is configured
3.5.1.5 Ensure ufw outbound connections are configured
3.5.1.6 Ensure ufw firewall rules exist for all open ports
1.0 3.5.1.7 Ensure ufw default deny firewall policy
3.5.2 Configure nftables
1.0 3.5.2.1 Ensure nftables is installed
1.0 3.5.2.2 Ensure ufw is uninstalled or disabled with nftables
3.5.2.3 Ensure iptables are flushed with nftables
1.0 3.5.2.4 Ensure a nftables table exists
1.0 3.5.2.5 Ensure nftables base chains exist
1.0 3.5.2.6 Ensure nftables loopback traffic is configured
3.5.2.7 Ensure nftables outbound and established connections are configured
1.0 3.5.2.8 Ensure nftables default deny firewall policy
1.0 3.5.2.9 Ensure nftables service is enabled
1.0 3.5.2.10 Ensure nftables rules are permanent
3.5.3 Configure iptables
3.5.3.1 Configure iptables software
1.0 3.5.3.1.1 Ensure iptables packages are installed
1.0 3.5.3.1.2 Ensure nftables is not installed with iptables
1.0 3.5.3.1.3 Ensure ufw is uninstalled or disabled with iptables
3.5.3.2 Configure IPv4 iptables
1.0 3.5.3.2.1 Ensure iptables default deny firewall policy
1.0 3.5.3.2.2 Ensure iptables loopback traffic is configured
3.5.3.2.3 Ensure iptables outbound and established connections are configured
1.0 3.5.3.2.4 Ensure iptables firewall rules exist for all open ports
3.5.3.3 Configure IPv6 ip6tables
1.0 3.5.3.3.1 Ensure ip6tables default deny firewall policy
1.0 3.5.3.3.2 Ensure ip6tables loopback traffic is configured
3.5.3.3.3 Ensure ip6tables outbound and established connections are configured
1.0 3.5.3.3.4 Ensure ip6tables firewall rules exist for all open ports
4 Logging and Auditing
4.1 Configure System Accounting (auditd)
4.1.1 Ensure auditing is enabled
4.1.2 Configure Data Retention
4.2 Configure Logging
4.2.1 Configure rsyslog
1.0 4.2.1.1 Ensure rsyslog is installed
1.0 4.2.1.2 Ensure rsyslog Service is enabled
4.2.1.3 Ensure logging is configured
1.0 4.2.1.4 Ensure rsyslog default file permissions configured
1.0 4.2.1.5 Ensure rsyslog is configured to send logs to a remote log host
4.2.1.6 Ensure remote rsyslog messages are only accepted on designated log hosts.
4.2.2 Configure journald
1.0 4.2.2.1 Ensure journald is configured to send logs to rsyslog
1.0 4.2.2.2 Ensure journald is configured to compress large log files
1.0 4.2.2.3 Ensure journald is configured to write logfiles to persistent disk
1.0 4.2.3 Ensure permissions on all logfiles are configured
4.3 Ensure logrotate is configured
1.0 4.4 Ensure logrotate assigns appropriate permissions
5 Access, Authentication and Authorization
5.1 Configure time-based job schedulers
1.0 5.1.1 Ensure cron daemon is enabled and running
1.0 5.1.2 Ensure permissions on /etc/crontab are configured
1.0 5.1.3 Ensure permissions on /etc/cron.hourly are configured
1.0 5.1.4 Ensure permissions on /etc/cron.daily are configured
1.0 5.1.5 Ensure permissions on /etc/cron.weekly are configured
1.0 5.1.6 Ensure permissions on /etc/cron.monthly are configured
1.0 5.1.7 Ensure permissions on /etc/cron.d are configured
1.0 5.1.8 Ensure cron is restricted to authorized users
1.0 5.1.9 Ensure at is restricted to authorized users
5.2 Configure sudo
1.0 5.2.1 Ensure sudo is installed
1.0 5.2.2 Ensure sudo commands use pty
1.0 5.2.3 Ensure sudo log file exists
5.3 Configure SSH Server
1.0 5.3.1 Ensure permissions on /etc/ssh/sshd_config are configured
1.0 5.3.2 Ensure permissions on SSH private host key files are configured
1.0 5.3.3 Ensure permissions on SSH public host key files are configured
1.0 5.3.4 Ensure SSH access is limited
1.0 5.3.5 Ensure SSH LogLevel is appropriate
1.0 5.3.7 Ensure SSH MaxAuthTries is set to 4 or less
1.0 5.3.8 Ensure SSH IgnoreRhosts is enabled
1.0 5.3.9 Ensure SSH HostbasedAuthentication is disabled
1.0 5.3.10 Ensure SSH root login is disabled
1.0 5.3.11 Ensure SSH PermitEmptyPasswords is disabled
1.0 5.3.12 Ensure SSH PermitUserEnvironment is disabled
1.0 5.3.13 Ensure only strong Ciphers are used
1.0 5.3.14 Ensure only strong MAC algorithms are used
1.0 5.3.15 Ensure only strong Key Exchange algorithms are used
1.0 5.3.16 Ensure SSH Idle Timeout Interval is configured
1.0 5.3.17 Ensure SSH LoginGraceTime is set to one minute or less
1.0 5.3.18 Ensure SSH warning banner is configured
1.0 5.3.19 Ensure SSH PAM is enabled
1.0 5.3.21 Ensure SSH MaxStartups is configured
1.0 5.3.22 Ensure SSH MaxSessions is limited
5.4 Configure PAM
1.0 5.4.1 Ensure password creation requirements are configured
1.0 5.4.2 Ensure lockout for failed password attempts is configured
1.0 5.4.3 Ensure password reuse is limited
1.0 5.4.4 Ensure password hashing algorithm is SHA-512
5.5 User Accounts and Environment
5.5.1 Set Shadow Password Suite Parameters
1.0 5.5.1.1 Ensure minimum days between password changes is configured
1.0 5.5.1.2 Ensure password expiration is 365 days or less
1.0 5.5.1.3 Ensure password expiration warning days is 7 or more
1.0 5.5.1.4 Ensure inactive password lock is 30 days or less
1.0 5.5.1.5 Ensure all users last password change date is in the past
1.0 5.5.2 Ensure system accounts are secured
1.0 5.5.3 Ensure default group for the root account is GID 0
1.0 5.5.4 Ensure default user umask is 027 or more restrictive
1.0 5.5.5 Ensure default user shell timeout is 900 seconds or less
5.6 Ensure root login is restricted to system console
1.0 5.7 Ensure access to the su command is restricted
6 System Maintenance
6.1 System File Permissions
1.0 6.1.2 Ensure permissions on /etc/passwd are configured
1.0 6.1.3 Ensure permissions on /etc/passwd- are configured
1.0 6.1.4 Ensure permissions on /etc/group are configured
1.0 6.1.5 Ensure permissions on /etc/group- are configured
1.0 6.1.6 Ensure permissions on /etc/shadow are configured
1.0 6.1.7 Ensure permissions on /etc/shadow- are configured
1.0 6.1.8 Ensure permissions on /etc/gshadow are configured
1.0 6.1.9 Ensure permissions on /etc/gshadow- are configured
1.0 6.1.10 Ensure no world writable files exist
1.0 6.1.11 Ensure no unowned files or directories exist
1.0 6.1.12 Ensure no ungrouped files or directories exist
6.1.13 Audit SUID executables Manual
6.1.14 Audit SGID executables Manual
6.2 User and Group Settings
1.0 6.2.1 Ensure accounts in /etc/passwd use shadowed passwords
1.0 6.2.2 Ensure password fields are not empty
1.0 6.2.3 Ensure all groups in /etc/passwd exist in /etc/group
1.0 6.2.4 Ensure all users’ home directories exist
1.0 6.2.5 Ensure users own their home directories
1.0 6.2.6 Ensure users’ home directories permissions are 750 or more restrictive
1.0 6.2.7 Ensure users’ dot files are not group or world writable
1.0 6.2.8 Ensure no users have .netrc files
1.0 6.2.9 Ensure no users have .forward files
1.0 6.2.10 Ensure no users have .rhosts files
1.0 6.2.11 Ensure root is the only UID 0 account
1.0 6.2.12 Ensure root PATH Integrity
1.0 6.2.13 Ensure no duplicate UIDs exist
1.0 6.2.14 Ensure no duplicate GIDs exist
1.0 6.2.15 Ensure no duplicate user names exist
1.0 6.2.16 Ensure no duplicate group names exist
1.0 6.2.17 Ensure shadow group is empty
Hello?
Do you know if any other file than the dtb and the /boot/extlinux/extlinux.conf file could affect the SPI interface?
Any clue on what next debugging steps I could try?