How to move the vehicle to its destination by using Python?

Hello, I scanned my vehicle using the Vehicle Dynamics extension provided by omniverse.
And I want to move my scanned vehicle to the desired destination using python coding.
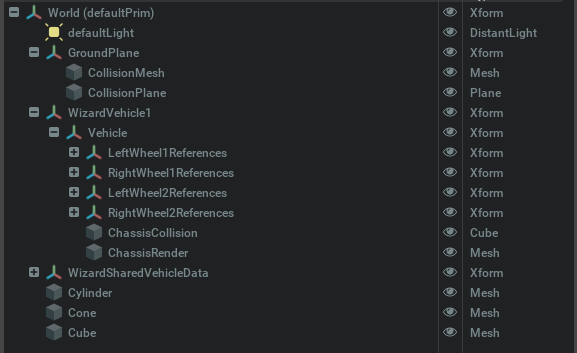
As shown in the screenshot below, I want my vehicle to automatically move to Cylinder when I press Keypad 1, Cone when I press 2, and Cube when I press 3.
I would appreciate it if you could give me an example or code of how I can do it.


image

Hello @toni.sm
It’s been a while since I said hello. Based on the method you taught me, it was very helpful for me to learn omniverse physics. Thanks once again.
I have a problem that I haven’t solved yet. As mentioned above, I would like to move my vehicle to the desired destination using python coding.
Since I used Unity, I was able to move the object to the desired destination using the NavMeshAgent.SetDestination scripting API for example.
However, it is still difficult for me as a beginner of omniverse.
Could you tell me a good API and code example?
Thank you for your kind help every time.
The ways and examples you help make it a good study book.

Hi @gudwnzm

To start, you can explore the Isaac Sim’s Navigation Sample Applications (particularly the example-2-robot-navigation) that demonstrates goal-driven navigation in an environment with no obstacles…

I think it would be the simplest way, without relying on external navigation libraries such as 7. ROS Navigation — Omniverse Robotics documentation or https://docs.nvidia.com/isaac/isaac/packages/navigation/index.html#navigation-stack

Hi @toni.sm
Thank you for your kind reply.
As you told me, I will study the sample and apply it to my vehicle.

Hi @toni.sm
I’m ashamed of you, but please Help me, please.
I have explored the Isaac Sim’s Navigation Sample Applications (particularly the example-2-robot-navigation ).

But now I’m having a hard time connecting my customized robot with Vehicle Dynamics extension to Isaac Sim’s Navigation Sample Applications.
I’m still an Omniverse beginner and I don’t have good skills, but the Isaac Sim’s Navigation Sample Applications example has some difficulty trying many things.

How could I choose my customized robot from the Robot Type in the Robot Navigation window?
Could I use pythong coding to move the robot to the destination I want?

I don’t know how to bring this good Isaac Sim’s Navigation Sample Applications to my scene and robot.

Hi @gudwnzm
Very busy times here

Note: Isaac Sim’s Navigation Sample is relying on the dynamic control extension and only supports the control of differential wheeled robots

To include a new robot you need to modify the _create_robot function (/home/toni/.local/share/ov/pkg/isaac_sim-2021.2.1/exts/omni.isaac.demos/omni/isaac/demos/navigation_preview.py) and define some variable specifying the robot USD path, joint names, wheel radius, and others… and add a new field to the self._robot_option dropdown item

Also, you can import and use the RobotController in other scripts to control a robot (differential wheeled robot), such as the next code which loads and control the Jetbot robot to reach the position (2, 1) meters when the P key is pressed

import math
import omni
import carb
import numpy as np
from pxr import UsdGeom
from omni.isaac.core import PhysicsContext
from omni.isaac.core.utils.prims import create_prim
from omni.isaac.core.utils.nucleus import find_nucleus_server
from omni.isaac.dynamic_control import _dynamic_control
from omni.isaac.demos.utils.simple_robot_controller import RobotController


stage = omni.usd.get_context().get_stage()
dc = _dynamic_control.acquire_dynamic_control_interface()
physx = omni.physx.acquire_physx_interface()

result, nucleus_server = find_nucleus_server()
if result is False:
    carb.log_error("Could not find nucleus server with /Isaac folder")   
asset_path = nucleus_server + "/Isaac"

PhysicsContext(physics_dt=1/60.0)

# add ground plane
create_prim(prim_path="/background", usd_path=asset_path + "/Environments/Grid/gridroom_curved.usd", position=np.array([0, 0, -9]))

# add robot
robot_usd = asset_path + "/Robots/Jetbot/jetbot.usd"
robot_prim_path = "/robot"
robot_chassis = robot_prim_path + "/chassis"

prim = stage.DefinePrim(robot_prim_path, "Xform")
prim.GetReferences().AddReference(robot_usd)

# robot controller
is_rc_initialized = False
rc = RobotController(stage=stage,
                     dc=dc,
                     articulation_path=robot_prim_path,
                     odom_prim_path=robot_chassis,
                     wheel_joint_names=["left_wheel_joint", "right_wheel_joint"],
                     wheel_speed=[10.0, 10.0],
                     goal_offset_threshold=[0.05, 0.05],
                     wheel_base = 0.12,
                     wheel_radius = 0.035)

# events
def keyboard_event(event, *args, **kwargs):
    if event.type == carb.input.KeyboardEventType.KEY_PRESS:
        if event.input == carb.input.KeyboardInput.P:

            # goal in centimeter (100, 100, 0) 
            stage_unit = UsdGeom.GetStageMetersPerUnit(stage)
            goal_x, goal_y, goal_z = 200 * stage_unit, 100 * stage_unit, 0
            max_speed = 250 * stage_unit
            start_vel, start_acc = 0.5, 0.02
            goal_vel, goal_acc = start_vel, start_acc

            rc.set_goal(goal_x, goal_y, math.radians(goal_z), start_vel, start_acc, goal_vel, goal_acc, max_speed)
            rc.enable_navigation(True)

def physics_event(step):
    global is_rc_initialized
    if dc.is_simulating():
        if not is_rc_initialized:
            rc.control_setup()
            is_rc_initialized = True
            return
        rc.update(step)

# subscribe to events
appwindow = omni.appwindow.get_default_app_window()
input = carb.input.acquire_input_interface()
input.subscribe_to_keyboard_events(appwindow.get_keyboard(), keyboard_event)

physics_sub = physx.subscribe_physics_step_events(physics_event)
debug_draw_sub = omni.kit.app.get_app().get_update_event_stream().create_subscription_to_pop(rc.draw_path)
Hi @toni.sm

I’d like to say thank you for your kind reply despite your busy schedule.
The information and materials you helped me not only learn but also translate them into Korean and organize them well and record them as learning materials later.

Thank you for helping me with valuable information and materials every time.

I’m making a real robot. I want to upload this robot to Omniverse through ROS and test PID control in Omniverse and then apply the result to the actual robot.
Would you tell me how to test the PID control algorithm that I wrote in Omniverse?

Lastly, In Isaac Sim’s Navigation Sample, when the robot moves to the target position, does the robot move to the destination using a* search algorithm?

Hi @gudwnzm

According to the import statements, the Navigation sample is using the Quintic Polynomials Planner (...isaac_sim-2021.2.1/exts/omni.isaac.demos/omni/isaac/demos/utils/quintic_path_planner.py)

If you will use ROS I think is better to go with the https://docs.omniverse.nvidia.com/app_isaacsim/app_isaacsim/tutorial_ros_navigation.html

1 Like

Hi @toni.sm
I really need your help.
I added my customized robot to Isaac Sim’s Navigation Sample by setting it as your advice.
And my custom robot was similar in structure to the Transporter in the demo example.
So I made the same structure of the Transporter robot, the Chassis, the wheel, and the Rigid Body, the Mass, and the Revolution Joint on my custom robot.
The Articulation Root is the same.

But there’s a problem.
There’s no problem getting my custom robot from Isaac Sim’s Navigation Sample.
When I click MOVE in the Robot Navigation UI, my robot’s wheels roll. But the problem is that my robot can’t go forward or move.
I put the rigid body in the chasis, left and right wheel just like the Transporter structure.
But when I press Play, my robot doesn’t fall down, it looks like a rigid body doesn’t exist.

How do I solve this problem so that my robot can go to the destination it wants?

I am sharing the code that added my custom robot from Isaac Sim’s Navigation Sample as you advised.

Hi @gudwnzm

It seems that your robot, from a physics point of view, is not well configured

I recommend you follow the steps of 1. Assemble a Simple Robot — Omniverse Robotics documentation tutorial that show “how to connect rigid bodies using joints, add joint drive to control the joints, as well as turning a chain of joints into an articulation”

Can you share a .usd file with your current stage?

Hi @gudwnzm

Because you defined revolute joints between each caster wheel and the chassis, you need to add Rigid Body property for those wheels too…

In your case, this solves the initial problem, but opens other four problems, as shown in the video (note: if the video is not displayed in Firefox, open this page in Chrome/Chromium)

A typical and practical solution is just to add a collision shape and set a physical material with low (or zero) friction for the caster wheel (no revolute joints).


Edited

Also, you will need to add fixed joints between the chassis and the caster wheels (with Rigid Body property)… or move the caster wheel prims inside the chassis

Hi @toni.sm
Thank you for your kind reply.
I will put the rigid body in each caster wheel according to your advice.

I’m sorry, but I still don’t understand that a typical and practical solution. If you don’t mind, could you show me?
If you show me, I’ll follow you.
Thank you for always helping me a lot.

Hi @gudwnzm

The Jetbot (Isaac Examples > Input Devices > Jetbot Keyboard) is a good example of this practice…

If you look at its caster wheel (caster ball), it is a mesh with a collision shape and it has assigned a physics material (/jetbot/caster_material)

This physics material sets the dynamic and static friction to zero to avoid slowing down or stopping the movement of the robot

Hi @toni.sm
As you advised, I put the rigid body in the each caster wheel, so it moves.
Thank you very much.

I will also apply what you just told me.

Hi @toni.sm
I removed the revolution joints of the each caster wheel and created and assigned the physics material to the each caster wheel by referring to the Jetbot example.
But my robot doesn’t move forward and slides little by little.
What’s the problem?

Hi @gudwnzm

It seems that the left and right wheels are not in contact with the ground plane… The collision shape of the casters slightly separates the robot from the floor

Use a more refined collision shape for the casters or lower the main wheels of the robot a little bit.

Hi @toni.sm
Thank you very much.
As you told me, I set the collisions a little more precisely, so they move well.
I’m so proud. Thank you!!!

This topic was automatically closed 14 days after the last reply. New replies are no longer allowed.