What is the recommended workflow for USD skeleton animations in UE5?

Hello! I am currently researching a good workflow for bringing my Blender animations into UE5 for rendering and I’m having some issues with SkeletalMesh animations not playing back and not being accessible through the Level Sequencer unless I import the USD file as an Unreal asset (even then there’s issues, more on that later).

I’ve tested the USD file in Create/Composer and it does play back correctly so the issue is not with the file itself.

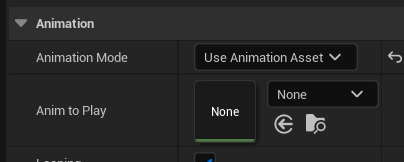
When I look at the USD Skeleton (before importing it as UE Asset), it has no Animation Asset attached to it and there’s no way to select one:
image

(Though I did manage to export a simple 1-bone Skeleton animation that did have an animation attached, but for some reason the Looping and Playing options below that were off by default)

So, I can get the animations to work (on the Sequencer too) if I right-click the USD file in the Content Browser and choose Import USD, but is that the correct workflow to get animations working? It seems like a lot of work, specially if I need to replace the asset with a different version down the line.

Also, I noticed that importing the USD file as an asset creates a Level Sequence for it, but I’m not sure how to use it because it seems to only contain the character on an empty level if I open it directly, and if I add it as a sub-sequence into a “master” Level Sequence, it can’t find the referenced Skeleton so it doesn’t work.

The only way I could get it to work (after importing it as an Unreal asset) was to drag the Skeletal Mesh into the world, add it to a new Level Sequence and attach an Animation track to it. Again, it seems like a lot of work so I’m not sure if this is the intended workflow.

One more thing I’ve been having issues with is scaling. My imported assets are usually tiny in UE (but not Blender or Composer), forcing me to scale them by 100x so they look correct (which can also cause issues with the animation), and from what I tested, changing either the Unit Scale or the Convert to Centimeters export option seem to have no effect whatsoever in the final scale.

Please let me know if I’m doing something wrong and sorry for the long post!

Yes, that’s the correct way to import the usd to uasset. Also, if you had the changes for the usd, you can right-click the imported uasset and select “Reimport” from the “Omniverse" catalog.
Another thing is that if you just wanted to import the usd animations, you can right-click the usd file and select “Import USD animation”, then assign the correct skeleton in the importer dialog. You’ll get the animation sequence only.

The tiny issue should be your unit of usd. It looked correct in Composer because the camera can be set close enough. Maybe your model is 1m x 1m x 1m, but somehow being exported as cm and the position wasn’t scaled 100, so 1cm x 1cm x 1cm is very small in Unreal.

Level sequence isn’t the asset you need to care about. You should find the animation sequence in the animation folder. When you had the animation sequence, you can set it to “Anim to Play” of your skeletal mesh.

you can right-click the imported uasset and select “Reimport” from the “Omniverse" catalog.

Oh that’s wonderful to know, thank you very much!

if you just wanted to import the usd animations, you can right-click the usd file and select “Import USD animation”, then assign the correct skeleton in the importer dialog

I assume I need to already have imported the Skeleton as Uasset, otherwise no Skeleton appears in the list:

Maybe your model is 1m x 1m x 1m, but somehow being exported as cm

I’m pretty sure I tried exporting with the “Convert to cm” option turned off, but I’ll play with it a bit more and see if I can get it to work.

Level sequence isn’t the asset you need to care about.

Noted! Thank you again for the help!

Yeah there’s definitely something wrong with the scaling.

All cubes are the default size of 1x1x1 on their respective software.

Also, I was mistaken previously with my “100x” factor, it actually seems to be 50x smaller.

In Composer the story is different though… maybe that’s why it looks fine there:

EDIT: Correction, I didn’t realize Blender’s default cube is 2m³. So 100x should be correct and a 1m³ cube should look identical in Composer. I was looking at scale, not dimensions, my bad.
image

Could you please send me a blender cube usd file?

Sure thing, sorry for the delay.

Blender_1m_Cube.usd (2.2 KB)

Also, I didn’t think to check until now but the imported Cube’s XForm has a scale of 100x100x100 in Composer. That should explain why it looks correct there. My bad again.

Right. I checked there’s no bug when importing the cube into Unreal. Blender scale 100 to the root when converting from m to cm, which means you can’t add any unreal cube under that root hierarchy (It will be scaled 100).

Blender scale 100 to the root when converting from m to cm, which means you can’t add any unreal cube under that root hierarchy (It will be scaled 100).

So you’re saying Blender sets the root XForm’s scale to 100 during export? Then why does it look small in Unreal and not Composer? That’s what I’m trying to understand and fix.

I checked there’s no bug when importing the cube into Unreal.

If the above is correct (about the root XForm) then Unreal must be ignoring the root scale, unless I’m misunderstanding something. Do you not have any scaling issues importing assets from Blender to Unreal at your end?

Also - can you please check if the Blender addon takes the Scene’s Unit Scale into account at all when exporting? It’s 1 by default and temporarily setting that to 100 for exporting is a good enough workaround for me (although a bit annoying). Thanks!

Blender didn’t change the point value of the mesh. So in order to convert to cm, 100 was set to the scale of the root prim of the mesh.
e.g. One point is (1, 1, 1) in meter, after converting to cm, it should be (100, 100, 100), however, blender still kept the old point value. So I’m not sure how you compared the mesh between Unreal and Composer, the mesh actually only had (1,1,1) cm without scale.
You’d better capture the Outliner in Unreal and Stage view in Composer.

UE cube

Composer 1x1x1 cube in UE

Blender 1x1x1 cube in UE (not converted)

Blender 1x1x1 cube in UE (converted)

Cubes in Composer

The only explanation I have is that Unreal is ignoring the root prim scale and setting it to 1 instead of 100.

Let me guess what you did:
In Unreal: You imported the blend usd to Unreal asset, then you found the static mesh asset and dragged it into the level.
In Composer: You just dragged the blend usd into the stage.

If I’m right, I can tell you what’s going on. The scaling is on the Xform prim, not Mesh prim, which means the scaling is just on the component, not static mesh. so the size of the real static mesh is still 1x1x1, not 100x100x100.
If possible, you can upload the usd to Nucleus Localhost, then find it in Omniverse folder and drag the usd to Unreal Level to compare. You should find the scaling is on the component itself, but the static mesh is tiny.

I think I’ll talk to Blender team about the issue. The scaling should be on the mesh prim itself, or even scaling the vertex directly when exporting, that will make the thing correct.

@Im_Ninooo There’re 2 ways to work for now:

  1. Don’t use “convert to cm” in Blender, you can use the meter as the unit of usd. Unreal will convert it to cm.
  2. You can select “import as Blueprint” in Unreal when importing the usd from Blender with cm. Then you can use the blueprint directly and don’t use the static mesh with wrong size.

We’ve filed an bug on this

In Unreal: You imported the blend usd to Unreal asset

Actually, no. I just dragged the USD file directly into the level (since there’s no animations in this case). Testing it again now it seems that the not converted cube does work correctly when importing as Uasset (screenshot below). Maybe I’ve just been doing it wrong this whole time (I should have properly described what I was doing. sorry!).

you can upload the usd to Nucleus Localhost, then find it in Omniverse folder and drag the usd to Unreal Level

That’s exactly what I’ve been doing, and at this point I assume that’s not the expected way to do it.

You should find the scaling is on the component itself

Not quite, as shown in the screenshots above, the “Actors” (XForm/mesh parent) have a scale of 1 when dragging the USD file directly.

The scaling should be on the mesh prim itself, or even scaling the vertex directly when exporting

Yes, applying the mesh scale (as IIRC we can do with FBX) would be the best option.

You can select “import as Blueprint” in Unreal when importing the usd from Blender with cm

Okay that’s quite interesting. Importing as Blueprint seems to work across the board. But I’m afraid I won’t be able to control a Blueprint’s animation from a Sequencer (I’ll test that soon) so for now not converting to cm seems to work fine when importing as Uasset (I thought I had tested that).

Anyway, I’d like to apologize for dragging this thread for so long and thank you for taking your time to explain everything to me, I deeply appreciate it!

Importing as Blueprint works just fine and does still allow me to control skeletal animation playback from the Sequencer.

This topic was automatically closed 14 days after the last reply. New replies are no longer allowed.